Nginx and Apache are the two most used Web application servers used in the development of Web / Mobile applications. In the technology stack for multi-layer applications, choosing the web application server has become an integral part of the process.

Apache was introduced before Nginx in 1994. It became popular and used in 1996. When the usage of Apache in developing web applications increased, people started getting to know the limitations of the Web server. One of the major issues found in Apache was handling multiple client connections at a time. Large and complex applications with a huge customer database started facing the C10K issue.
What is the C10K problem?
The C10K issue is the server’s restricted functionality to handle 10,000 clients simultaneously. In simpler words, if you have limited infrastructure and scaling is required to handle more than 10,000 clients, Apache gives performance issues.
As a resolution to this issue, Nginx came into existence in 2002. The official release for the public was released in 2004. The web server’s architecture relies on event-driven methodologies and asynchronous client connections.
It gained popularity for its lightweight architecture and scaling capabilities on the minimum hardware setup.

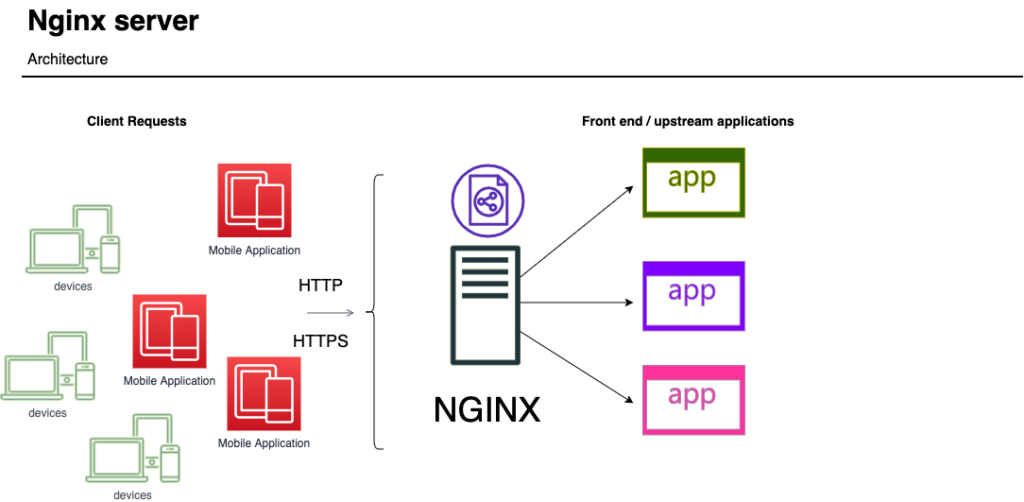
Nginx Features
Let us understand the features of Nginx based on its architecture.
- Connection Handling Capabilities – The server is built based on the worker processes. Each process can handle multiple connections in thousands.
- Event-driven Mechanism – Whenever a new event is triggered, the connection is established by the work process. This allows the non-blocking structure to work with event processing. The client connection is closed, it is removed from the loop allowing the process to work with other established connections.
- Ability to work seamlessly under heavy load – It is a single-threaded server, the memory and CPU are utilized consistently as worker processes are not created each time the new connection is established.
Nowadays, the cloud serving platforms such as DigitalOcean, Amazon EC2, Microsoft Azure, and Google Cloud Computing platform, provides instances with easy to install and configure Nginx on Windows as well as Linux-based platforms. Manually installing the server on a local machine is the process that every developer should know.
To install and configure the server on Ubuntu manually, we need to know the set of commands that are used. Now, let us see how the Nginx server is set up on Ubuntu.
Install Nginx on Ubuntu (step-by-step guide)
- Open the terminal in your Ubuntu system.
- Login as a root user.
- Type the command sudo.
- Enter the password and press ENTER.
- You are logged in as a root user.
| ridz@hostname:~pwd /home/ridz sudo -i Password: root# |
- Install the prerequisites before you install Nginx.
- Run the command, sudo apt install curl gnupg2 ca-certificates lsb-release, and press ENTER.
- This will download packages to your system.
| ridz@hostname:~pwd /home/ridz sudo -i Password: root# sudo apt install curl gnupg2 ca-certificates lsb-release |
- Set up the apt repository. This is a repository of network or local directories containing packages and metadata files readable by APT tools. Enter the below command to install the packages in the APT repo. Press ENTER to run the below command.
| root# echo “deb http://nginx.org/packages/ubuntu `lsb_release -cs` nginx”| sudo tee /etc/apt/sources.list.d/nginx.list |
- You can alternately use the below command to install stable packages of Nginx. The only difference between the above and the below command is, that the packages will be installed from the mainline branch which is stable in the production environment.
| root# echo “deb http://nginx.org/packages/mainline/ubuntu `lsb_release -cs` nginx” | sudo tee /etc/apt/sources.list.d/nginx.list |
- Import the Nginx sign-in key to verify the packages installed are authentic. To do this, enter the following command and press ENTER. You will get the sign-in key after running this command.
| root# curl -fsSL https://nginx.org/keys/nginx_signing.key | sudo apt-key add – |
- Verify the key you have got is appropriate. Run the following command and press ENTER for key verification. Enter the 16-digit alphanumeric key that you have received.
| root# sudo apt-key fingerprint {16-digit alphanumeric key} |
- You will receive the below output as a confirmation of the key. The 42-digit fingerprint ID will be shown. In addition to that, you will see the key expiry date of the key you have got.
| pub rsa2048 2010-09-19 [SC] [expires: 2025-06-14] 123B KD2B 5A9G AC64 1079 A6AB ABF5 BD82 7BD9 BF62 uid [unknown] Nginx signing key <[email protected]> |
- Install Run the below command and press ENTER. Before running the install command, this command will update your apt repo. The apt install Nginx command will install the Nginx server successfully on your system.
| sudo apt update sudo apt install Nginx |
- You will see the success info post-installation of nginx.
The next step is to set up Nginx.conf to run the server on your localhost. You can set worker processes, connections, ports, and the request types, request methods, and errors as a part of the Nginx web server configuration.
To obtain more information on advanced configuration, please go to https://www.nginx.com/resources/wiki/start/topics/examples/full/.
| #user nobody; worker_processes 3; #error_log logs/error.log; #error_log logs/error.log notice; #error_log logs/error.log info; #pid logs/nginx.pid; events { worker_connections 1024; } http { include mime.types; default_type application/octet-stream; #log_format main ‘$remote_addr – $remote_user [$time_local] “$request” ‘ # ‘$status $body_bytes_sent “$http_referer” ‘ # ‘”$http_user_agent” “$http_x_forwarded_for”‘; #access_log logs/access.log main; sendfile on; #tcp_nopush on; #keepalive_timeout 0; keepalive_timeout 65; #gzip on; server { listen 80; server_name localhost; #charset koi8-r; #access_log logs/host.access.log main; location / { # Simple requests if ($request_method ~* “(GET|POST)”) { add_header “Access-Control-Allow-Origin” *; } # Preflighted requests if ($request_method = OPTIONS ) { add_header “Access-Control-Allow-Origin” *; add_header “Access-Control-Allow-Methods” “GET, POST, OPTIONS, HEAD”; add_header “Access-Control-Allow-Headers” “Authorization, Origin, X-Requested-With, Content-Type, Accept”; return 200; } root html; index index.html index.htm; } #error_page 404 /404.html; # redirect server error pages to the static page /50x.html # error_page 500 502 503 504 /50x.html; location = /50x.html { root html; } } |
The server’s capabilities such as flexible, scalable, and powerful make it easier for the development team to decide to go for Nginx as a part of the technology stack.