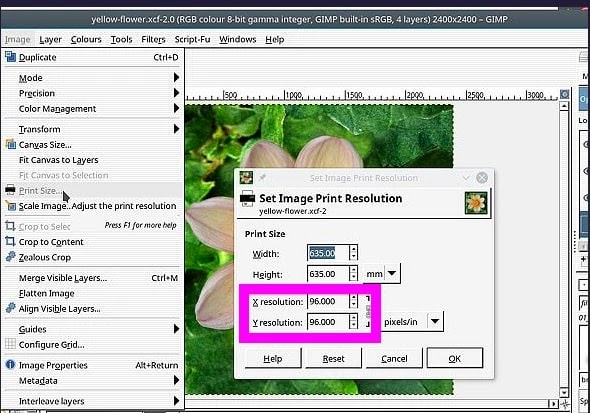
To Change DPI in GIMP follow the below steps:
- Open GIMP Editor
- Select the Print Size option from Menu.
- Change X and Y resolution from that dialog box.
- DONE! dpi changed successfully

DPI (dots-per-inch) is a resolution measure of an image that is used for setting the quality of an image. Adjusting dpi is available in all image editors, be it desktop apps or online editors. Vector files are the source image files that cannot be used as original due to image format and size.
How to determine DPI in an image
It is a very simple calculation to determine the DPI of an image.
Image Size in px = 700 pixels x 300 pixels
Image Size in in = 3.5 in x 1 in
DPI = 700 / 3.5 = 200 dpi
How to change DPI in an image using GIMP
- Open an image in the GIMP editor.
- Pick the menu – Image.
- Under that, choose a Print size.
- You shall see the pop-up box with the title – Set Image Print Resolution.
- DPI is nothing but, X resolution and Y resolution.
- Modify the resolution as desired.

- OK action on the pop-up and there you go! The dpi is set.
Recommendations to set DPI in Print Media and Web Media
In any image editor, you have an option to alter image properties. Whenever there is a need to use the image, please consider whether the image needs to be printed for marketing purposes or it needs to be used as a soft copy on Web platforms such as apps, browsers, etc.
For printing the image, always remember that the print quality should not be compromised. Always set 300 dpi or px for normal printing purposes.
For web images, always remember that the image size should not exceed the space or occupy the larger space. Always set 72dpi/px for using web media. On the Web, lots of images are required to make a web app / mobile app interactive. Keep the resolution low without compromising the quality.
Takeaway
Images are the assets of Web, app, and print media. Using it correctly makes the design of the product attractive and qualitative. Just keep the sizes and resolution (DPI) correct.

