How to Boot Pendrive
In the older days, computers/laptops were available with DVD/CD drives. These drives were used to install any application or operating system. Nowadays, these drives are no longer available with new generations of computers/laptops. USB Pen Drives have taken the place of DVD/CD drives.
Why boot Pendrive?
There are times when your operating system is corrupted, or somehow, it is not working properly. A need to install the operating system arises. But, the problem is when your operating system doesn’t work, you cannot proceed beyond booting your computer. In such a situation, you can boot the operating system via a bootable Pendrive.
There can be other symptoms that your operating system doesn’t work correctly. Some of them are – hardware drivers that are outdated or corrupted, some of the system files are corrupted, and hard drive issues such as a bad sector or other hardware failures.
Bootable Pendrive helps to repair, recover and reinstall the operating system. The USB port(s) are available in all computers/laptops/MacBooks. It is a simple step thereafter. Insert your bootable Pendrive in the USB port, select the bootable Pendrive from your BIOS setup and continue the process of repairing the operating system.
Assuming you already have created a bootable Pendrive, let us see the steps on how to boot the Pendrive from different machines having Windows, Linus, and Mac OS operating systems.
There are two ways to make the Pendrive bootable.
- Make bootable Pendrive using the User Interface
- .Make bootable Pendrive using the Command Line option (CMD)
We will go through the steps of making a bootable pen drive using the CMD option in different operating systems.
Make Bootable Pendrive using CMD in Windows
A USB flash drive with at least 16 GB of storage is required to make it bootable. Follow the steps below to create the USB Pendrive bootable in Windows OS.
- Format the Pendrive. We will use the command prompt for formatting the drive.
- Press the Windows key + X on your keyboard. The command window appears.
- Insert the Pendrive in the USB slot of your computer/laptop.
- Make sure you are in the “Windows → System32” directory.
- If not, type cd. You will need to type this command till you are in your C:/ drive.
- Then, enter cd Windows. You will be in the Windows directory.
- Enter cd System32. You will be in the System32 directory.
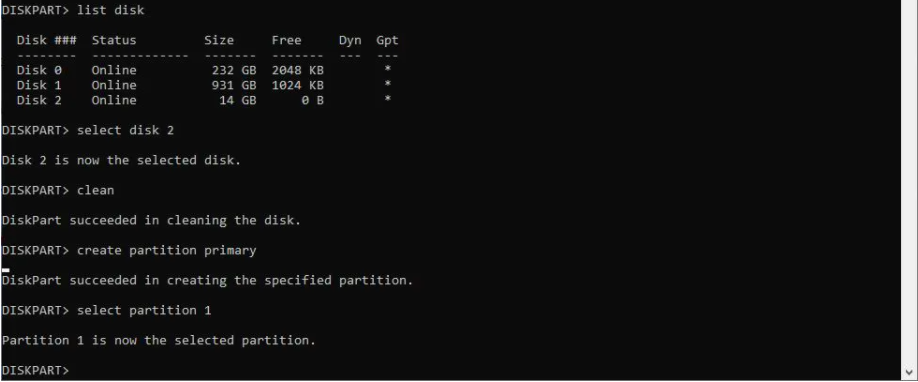
- Enter the command, diskpart.
- Press ENTER.

- Enter the command, list disk, and press ENTER. You will see a list of disks available on your computer, including your USB flash drive.

- In the screen above, the Disk 2 option with the 14GB size looks like it is the USB disk drive.
- Enter the command, and select Disk 2. Press ENTER. You will see the message as the selected disk is now disk 2.

- Enter the command, clean. Press ENTER. The formatting starts.
- Once the formatting process is finished, you will see the success message.

- After formatting the Pendrive, you need to create the bootable.
- Based on your Windows version, you can create the bootable format. There are two options for bootable format. 1) Master Boot Record – MBR (used for Windows 7) 2) GUID Partition Table – GPT (used for Windows 8 and later)
- For Master Boot Record bootable:
- Enter the command, and convert MBR.
- Press ENTER. The successful conversion to the Master Boot Record format message appears as below.

- Enter the command, and create partition primary—press ENTER.
- The partition success message appears as below.

- Enter the command, select partition one, and press ENTER.
- Enter the command, active—press ENTER. The current partition is enabled.

- Enter the command, format fs=ntfs quick—press ENTER. The partition is formatted as an NTFS file system.

- The formatting process of a Pendrive is completed successfully.
- Enter the exit command to come out from DISKPART. You have successfully created the Master Boot Record bootable format.
- For GUID Partition Table bootable:
- You will need to create two partitions instead of one. In this case, the Operating System (Windows 8 or later) recognizes the FAT32 file format.
- All the steps are the same as mentioned in the Master Boot Record formatting the drive.
- Enter the command, convert gpt. Press ENTER.

- Type the command, and create the primary partition size=64. Press ENTER. This creates an EFI partition. EFI partition supports the hard drive drivers available with Windows 8 or later.
- Now, type the command, and create partition primary. Press ENTER. This creates a data partition.

- Type the command, and select partition 1. Press ENTER. Partition 1 is selected.
- Type the command, format fs=fat32 quick. Press ENTER.

- Type the command, and select partition 2—press ENTER. Partition 2 is selected.
- Type the command, format fs=ntfs quick—press ENTER.

- For Master Boot Record bootable: Now, copy the ISO image file from your computer to your Pendrive. NOTE: ISO image file is the image of a disc. The file format is .iso and is used as a compressed format of installation software.
- To do the above step, go to the directory where your ISO file is stored.
- Type the command, copy f:\<filename>.ISO /s/e/f g:.
- Press ENTER. NOTE: In the above command, the f: drive is the source drive where your ISO file is located. You will need to replace <filename> with the actual ISO name. G: drive is your USD drive slot.
- You have successfully created the bootable Pendrive for Windows 7 or earlier versions.
- For GUID Partition Table bootable: Go to https://efi.akeo.ie/downloads/efifs-latest/.
- Download these folders: ntfs_x64.efi, ntfs_ia32.efi, ntfs_aa64.efi, ntfs_arm.efi from the above URL.
- Copy these folders in the partition one you have created in your Pendrive.
- Copy the ISO image of the operating system in the partition two you have created in your Pendrive.
- You have successfully created the bootable Pendrive for Windows 8 or later versions.
Make Bootable USB using CMD in Linux.
- Prerequisite – your computer should be powered on.
- Insert the USB pen drive into the USB slot of your computer/notebook.
- Open the terminal. To open the terminal, press the CTRL + ALT +T keys on your keyboard.
- Enter the command, dmesg. In the terminal window, you will see the message logs. On the screen below, TinaS is the name of the USB flash drive you have inserted in the USB slot.

- Type the command su. Press ENTER.
- Enter the root password. Press ENTER.
- Now, enter the command, findmnt device. Replace the device with the USB drive name you found on the above screen.

- Press ENTER.

- The next step is to unmount the Pendrive.
- Look at the TARGET column on the above screen. It shows /mnt/iso.
- Enter the command, umount /mnt/iso. Press ENTER. The unmount process is successful.

- Enter the command, dd if =/image_direction/image.iso of =/dev/device bs=blocksize. Press ENTER. This command copies the installation ISO image directly to your Pendrive.
- In the above command, replace /image_directory/image.iso with the actual directory path of the ISO file you have stored. (The bs command is used to increase the speed of the writing process.)

- Let’s take an example: If the ISO image is located in /home/devuser/Downloads/rhel-server-7-x86_64-boot.iso and the detected device name is TinaS. The command will be as follows.

- The command dd will finish copying the image to the Pendrive.
- Wait for a few seconds to complete the process.
- Log out from the root account. Remove your USB drive from the USB slot of your computer.
- You have successfully created the bootable Pendrive.
Make Bootable USB using CMD in Mac OS
- Prerequisite – Your USB flash drive should have at least 12GB of free space available.
- Make sure your USB flash drive is formatted as Mac OS Extended.
- For more information, click here: https://support.apple.com/en-us/HT208496. You can perform the steps from the macOS Utilities → Disk Utility option.
- Inject your USB flash drive into any one of the USB slots of your Mac.
- Press the POWER button to start your Mac.
- Open the terminal.
- Press the command + SPACEBAR keys on your keyboard. The spotlight search bar appears.
- Enter the text, terminal. App and press ENTER. The terminal is open.
- Enter the command, createinstallmedia when you are in the Resources folder. The command will look like the below. (For each Mac OS version, the command is given.)
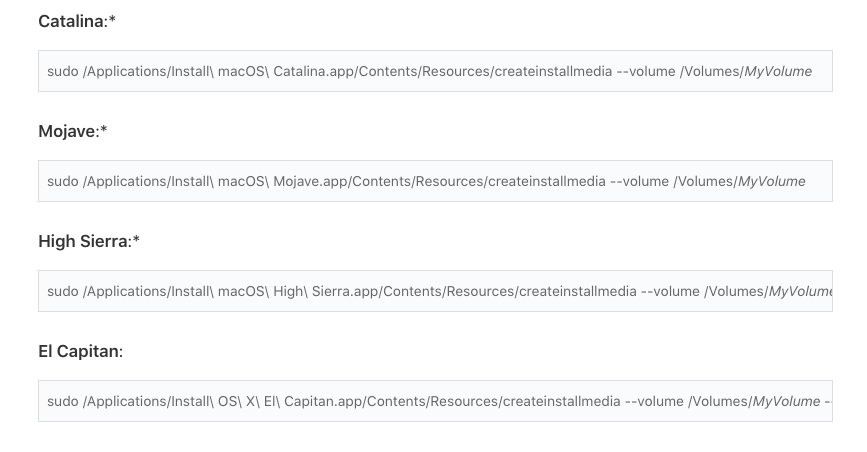
- In the above command, replace MyVolume with your USB drive name.
- Press ENTER after entering the createinstallmedia command.
- Enter your password when prompted. Press ENTER.
- Enter y when prompted. This will format the volume. Press ENTER.

- When it shows the Done message, and you are at root, quit the terminal. To quit the terminal, enter the command and exit. Press ENTER.
- Eject the USB flash drive. Your bootable USB drive is ready.
How to boot Pendrive in Windows 10
- In the USB slot of your computer, insert the Pendrive which is bootable.
- Press the POWER button to start your computer/laptop.
- Press the F2 key on your keyboard. You will be on the BIOS setup of your machine.
- Make sure you are on the Main tab of the window.
- Press the RIGHT-ARROW key on your keyboard to navigate to the Boot tab. You will see the Boot Settings section as shown below.

- Make sure you are on the Boot Device Priority menu. Press the UP ARROW key if required to be there.
- Press ENTER. Make sure you are on the 1st Boot Device list item.

- Press the UP ARROW key if required to navigate to the 1st Boot Device list item.
- Press ENTER. The list of options appears. For example – CD/DVD drive, HDD, or USB Flash drive.
- Select the USB-HDD option.
- Press ENTER. The option is selected.
- Press the F10 key to save and reflect the changes.
- Press the ESCAPE key. You will be moved out from the BIOS menu.
- Now, your operating system, Windows 10, will be loaded from the bootable Pendrive.
How to boot Pendrive in Windows 7
- Insert the Pendrive, which is bootable in the USB port of your computer/laptop.
- Press the POWER button to start your computer/laptop.
- While booting, the Boot Menu prompt appears. (On some computers, you may not have this option. In that case, press F2 to open the BIOS setup and change the boot settings from there.)

- Use the ARROW keys of your keyboard and go to the Removable Devices option.
- Press ENTER. Select the USB option from the list.
OR
- Alternatively, from the BIOS menu, select the Advanced BIOS Features list item.
- Make sure the First Boot Device list item is highlighted. If not, please press the UP ARROW key on your keyboard to go there.

- Press ENTER. A menu with a list of options appears.

- Move to the USB-HDD option using the DOWN ARROW key on the keyboard.
- Press ENTER. The above-mentioned option is selected with a square bullet sign in the square brackets.
- Press the F10 key to reflect the changes to your bootable device option.
- Press the ESC key to exit the BIOS setup.
How to boot Pendrive in Linux
- Press the POWER button to switch off your computer/laptop.
- Insert your bootable Pendrive in the USB slot of your computer/laptop.
- Press the POWER button again to power on your machine.
- Press the F2 key or the F10 key of your keyboard. You will see the list of methods in the list.
- Choose the boot method as Full installation media (DVD or USB).
- The Linux operating system will automatically be loaded from the inserted bootable Pendrive.
How to boot Pendrive in Mac OS
- Power of your MacBook.
- Insert your bootable Pendrive in the USB slot of your Mac.
- Use the POWER button to switch on your Mac.
- Press and hold the Option (alt) key quickly on the startup. The macOS utility screen appears.
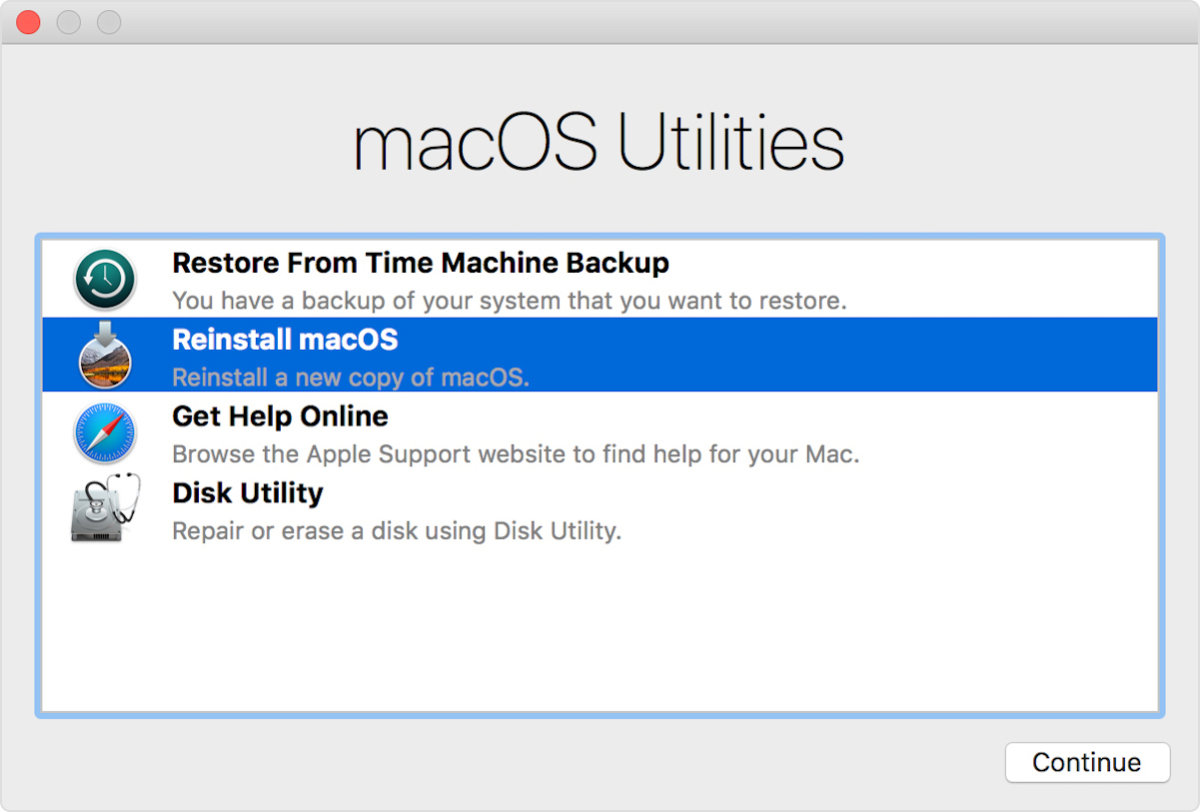
- Click to select the Reinstall macOS option. Click the Continue button.

- Click the USB drive icon where the Install macOS Mojave label option is shown. The Mac OS will be loaded from the USB drive.
We have seen the steps of booting the different operating systems from the USB drive using the Boot menu option from the BIOS. In the next section, we will see how to make a USB drive or a Pendrive bootable.
Operating systems are installed from the hard disk drive of your computer/laptop. If the operating system is not working properly or giving issues booting from your machine’s hard drive, there is a need to make the bootable Pendrive. To repair and re-install the operating system, a bootable Pendrive can be used to fix the issue.
Conclusion
It is recommended to make Pendrive bootable or your USB drive bootable with the command line (CMD) window. There are chances that your drive is not formatted properly using the User Interface (UI), or the partitions may not get created appropriately using the User Interface.
The steps to make a bootable device via CMD are lengthy, but it ensures that the bootable drive is made without any errors, and while you want to load the operating system using your bootable Pendrive, it loads successfully.
It is always suggested to keep the USB drive bootable of your operating system and keep it as a backup. Whenever you encounter any issues with the operating system, you are ready with the bootable Pendrive.
Read: How to update BIOS software of computer.
