Recycle bin refers to the trash where you can move your unwanted/temporary files.
When you delete any file located on your hard drive, it moves to the recycle bin. It is temporarily deleted, but not permanently.
Data storage has become a concern for most computer users. The usage of Internet browsing, working on files offline, watching movies, listening to music, coding, or designing graphics – all consume memory as well as storage space. Any work you do with media or content, the data will be generated and stored in the system’s hard drive.
Online Storage – Google Drive / OneDrive / Dropbox
Alternative storage options for the users have been introduced by Google, Microsoft, Dropbox, Wetransfer, and so on. The virtual drive associated with your online account is used for data storage. They provide very limited storage per user account.
Google drive provides 15GB of storage per account, OneDrive provides 5GB of storage per outlook account, Dropbox offers 50GB per account, and so on. But, still, it’s not enough. Again, data consumption has increased tremendously in the past few years.
Internet Downloads
Not all files and folders are created by you while you are working on the computer. You download images, PDFs, Word documents, Excel sheets, Images, Photos, Pictures, Audio files, and Video files from the Internet. All your downloaded content is saved in the Downloads folder in your C: or D: drive based on the default path you have set.
Installation files (Executables)
Most of the tools are available online and used online today. You do not have to install these tools necessarily in your system. Still, there are some applications that Online tools cannot replace. For example, you need to set up a coding environment in your local machine. For MS-Excel where you need to handle a huge amount of data with macro plug-ins installed cannot be replaced with Google Spreadsheets. The files with .exe file format are installation files, also called “executables” in the Windows system. These executables’ size is considerably large and consumes lots of space.
Temporary Files, Cache files
A lot of temporary files are created while you are surfing the Internet. Many websites are built with a caching mechanism to load faster and perform better. The websites use images, animations, and videos that are stored in your browser. Your browser is installed in your system. Indirectly, it stores unwanted files in your system folders. You are not aware of the location where these files are stored.
Time to clear your data
We saw how data is stored in your system’s files and folders in several ways. When you are working on your computer, all of a sudden you find your system has come damn slow. Clicking on the folder or opening any file takes longer than usual. You cannot perform your regular work with ease. You cannot Your computer performance has started impacting your routine work.
What to do next? All you need to do is to check your system hard drive space. Let us see how you check how much hard disk space is available in your Windows 10 machine/desktop.
To check if your hard drive is full:
- Open your Windows Explorer by pressing the Windows key + E.
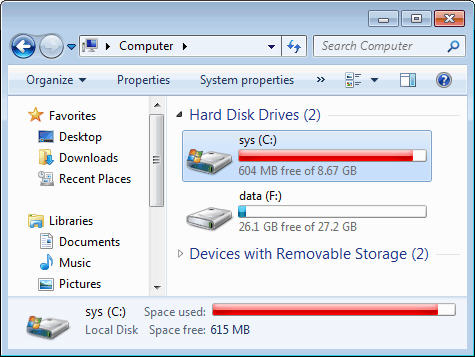
- Right-click on your C: Drive to check used space.
- Another way to view details of the used space, go to Settings → Storage.
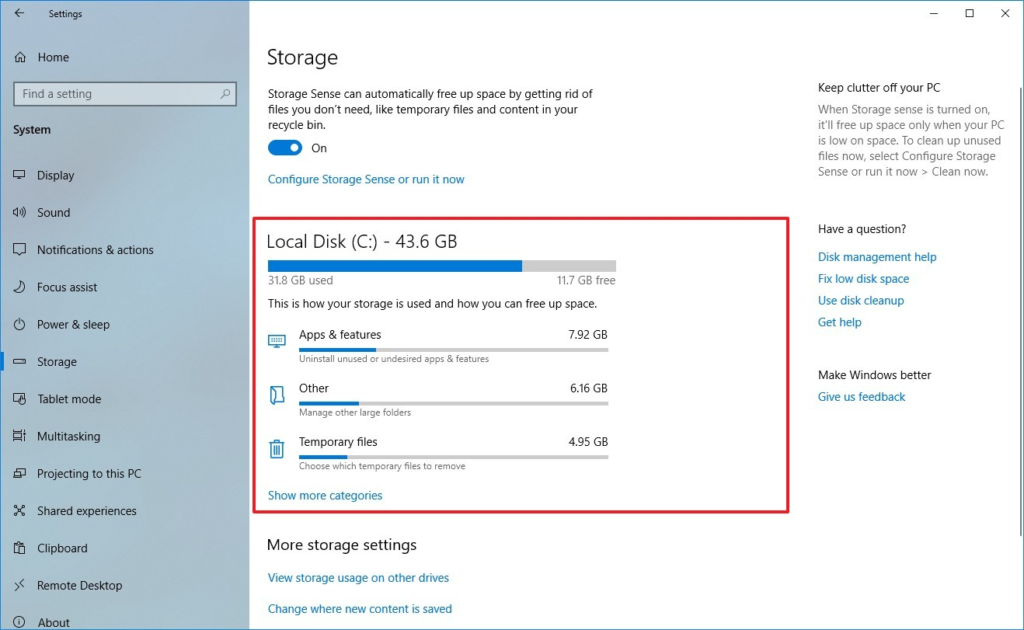
- You will see the used space by different categories of files.
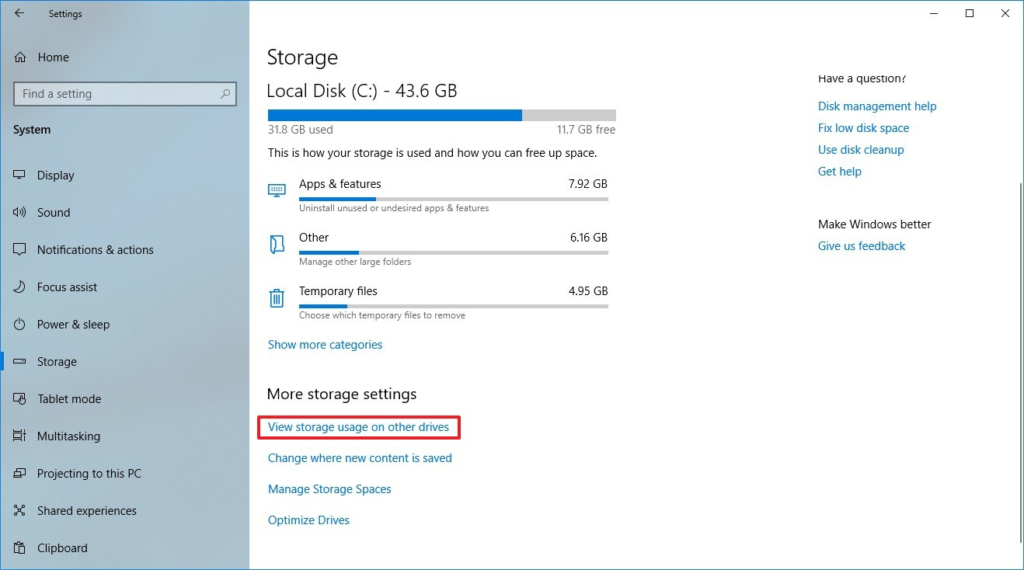
- You can also go to the More storage settings section and click View storage usage on other drives.
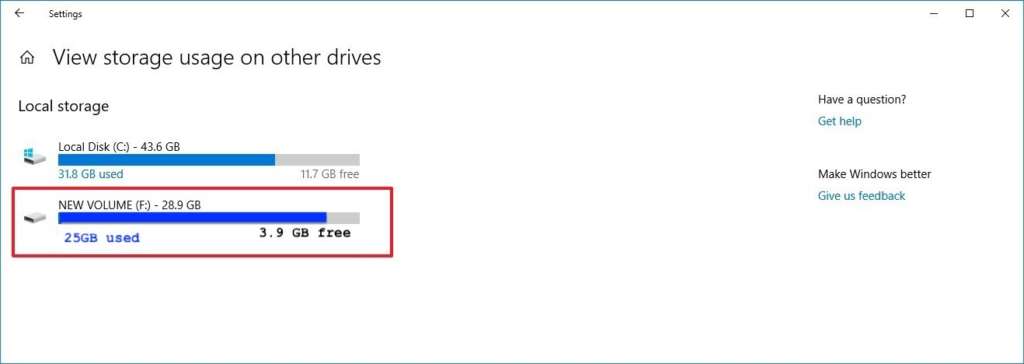
- You can view used storage for the other drive found in your system.
- Another way to figure out if the disk is full is you will get the desktop notification from the system that you are running out of space.
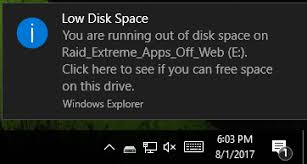
- The next step is to clear the storage.
- Click on the notification to free up the space.
- Empty recycle bin on regular basis.
- Delete duplicate files and temp files.
- Remove large files
- Move your important files to an external hard drive
- Move your data to cloud storage (G-Drive, OneDrive, Dropbox)
From all of the above scenarios, all we need to do is empty the recycle bin on a regular basis. There are different ways to clear your recycle bin on Windows 10 desktop/laptop.
Resolution 1 – Clear the recycle bin from Desktop Shortcut
- Check you have a Recycle bin icon on your desktop. If not, then create the desktop shortcut by following the steps below.
- Go to Settings from the Start menu.
- Select Personalization and click Themes.
- From the themes, click the Desktop icon settings. The Recycle bin checkbox is not selected.
- Tick to select the Recycle bin checkbox. Click Apply.
- The Recycle bin icon will be available on the desktop.
- Right-click the recycle bin icon. From the right-click menu, click the Empty Recycle bin option.
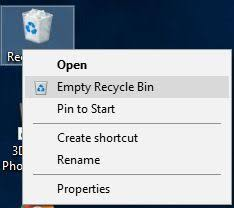
- A confirmation pop-up will appear asking you to permanently delete the files.
- Click Yes on the pop-up to remove the files from the recycle bin permanently.
Resolution 2 – Empty the recycle bin from Windows File Explorer
- Open your File Explorer by pressing the Windows + E keys on your keyboard.
- Search for the Recycle bin option.
- Enter the keyword Recycle bin in the Search bar of your Windows File Explorer. Press ENTER.
- You will see the Recycle bin window.
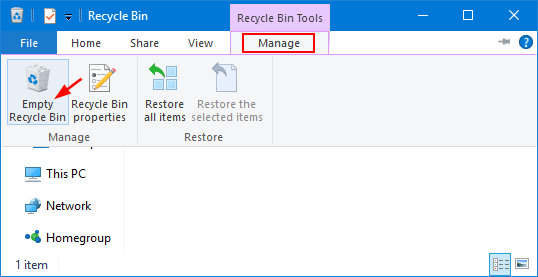
- Click the Manage tab. You will see the Empty Recycle Bin icon.
- Click the Empty Recycle Bin icon. You will get the prompt asking to confirm permanent deletion of data from your hard drive.
- Click Yes. The data will be removed from the recycle bin.
Resolution 3 – Empty the recycle bin using the Command (CMD) Prompt
- Make sure you are logged into Windows 10 with the Administrator profile.
- Type the cmd text in the start menu. The command window appears.
- Make sure you are in the home directory of your system. If not, please use the cd command to get back to the Home directory.
- Type the command, rd /s c:\$Recycle.Bin. Press the ENTER key on your keyboard.
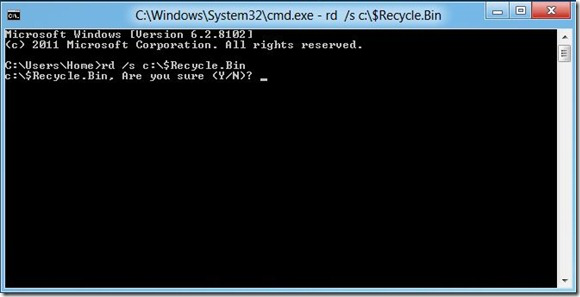
- You will be asked to confirm deletion with the following.
- Are you sure (Y/N)?
- Type Y to confirm the deletion.
- You have successfully cleared data from the Recycle bin.
- Enter the command Exit and press ENTER to close the command line window.
Resolution 4 – Use the Disk Cleanup utility to clear the Recycle bin data
- Open Windows File Explorer. You will see the drive letters for the partition you have created.
- Right-click the C:/ drive. The right-click menu is shown.
- Click the Properties option. The properties pop up is displayed.
- Click the Disk Cleanup button. The dialog box for the disk cleanup utility appears.
- Select the Recycle bin check box. Click OK on the dialog box.
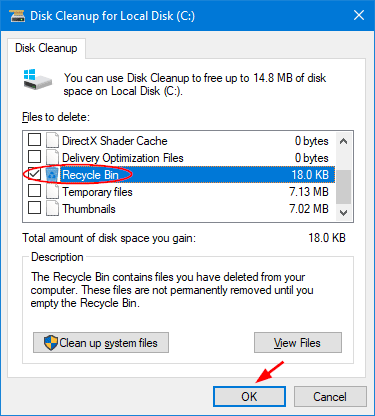
- On clicking OK, the pop up appears asking to permanently delete the files.
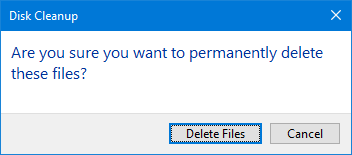
- Click the Delete Files button from the pop up.
- You have successfully deleted your files from the Recycle bin folder.
Resolution 5 – Use SHIFT + DELETE to clear your data from the Recycle Bin folder
- Open your Window File Explorer.
- Double-click the Recycle bin folder. The Recycle Bin window with the data files appears.
- Press CTRL + A to select all the files located in the Recycle Bin folder.
- Once all the files are selected, press the SHIFT + DELETE keys on your keyboard.
- You will be asked to confirm the deletion of the files.
- Confirm by clicking the Yes button. You have successfully deleted the files.
Resolution 6 – Manage Automatic Deletion of Files from Recycle Bin
- From the Start menu, click Settings.
- Go to System and then, the Storage option. The Storage window appears.
- Click the link – Change how we free up space automatically.
- Go to the Temporary Files section.
- Select the Delete temporary files that my apps aren’t using checkbox.
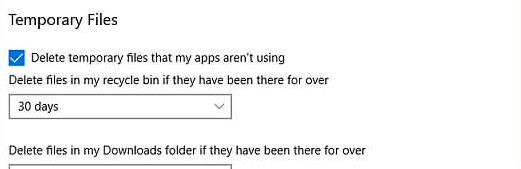
- Select the frequency of auto-deletion of files from the recycle bin.
- Based on your preferences, select the number of days from the list below.
- 1 day
- 14 days
- 30 days
- 60 days
- Save your preferences and exit from the Storage window.
- Now, you do not have to remove your unwanted files from the Recycle bin manually. It will automatically delete the data every number of days you have defined.
Though it is a simple and small feature, it is very useful from the system performance point. You can optimize your system performance by performing any one of the methodologies to clear or remove the data from the recycle bin. No need to go to any technician to check out your system performance till you troubleshoot the steps above yourself.
Read: How to Find & Delete Unnecessary and Cache Files
