The basic visual design and easy gameplay of Minecraft have the potential to make it a resource-intensive software despite its low resource requirements. Particularly if you start playing with Redstone-heavy structures, the game’s background becomes very dynamic.

Because of the addition of changes to the mix, the usual amount of RAM needed to run Minecraft becomes inadequate to ensure that the game operates correctly. It is possible that you may have stuttering, crashes, and other issues that will make the game practically unplayable if your machine does not have enough RAM.
Minecraft, with its simple graphic style and very basic gameplay, may prove to be a challenging software to learn due to its simplicity. When you start playing Redstone-heavy building games, you’ll realize that there are a host of processes happening in the background that you’ll have to deal with. After making modifications to the equation, the amount of RAM that Minecraft normally uses becomes inadequate to meet the game’s requirements.

In addition, if your computer does not have enough RAM, you will have other issues that will make the game practically unplayable. While utilizing the personal Minecraft versions, you should be able to allocate RAMs from launcher versions 1.6 to 2.0.X without any problems at all. It is possible to determine the version of the launcher you are currently using by looking at the version number in the lower-left corner of the launcher window.
A file that enables Minecraft to run with additional memory must be created when you increase a RAM server’s RAM. It is advised that you do not allow Minecraft to consume more than half to two-thirds of the total RAM available on your machine at any one point in time.
However, increasing the amount of RAM accessible to Minecraft is a straightforward process. It is also encouraging to know that there are a variety of ways to take care of one’s affairs.
Check whether you have enough RAM on your computer.
- The first step is to discover exactly how much RAM is presently available on your computer system. This is a straightforward assignment.
- To begin, pick the Settings icon from the Start menu and then click on it (it looks like a gear).
- More information may be found at About.
- The phrase “Installed RAM” may be found under the heading Device Specifications. The amount of RAM you have available will be shown by the number next to that field.
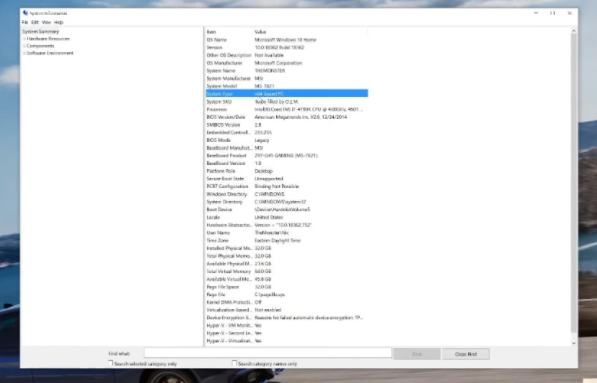
It is suggested that you have at least 2 gigabytes of RAM, but a minimum of 4 gigabytes is required for Minecraft. As long as you have anything more than that, you are in excellent condition. You are now able to allocate all of the RAM that Minecraft needs in order to fulfill its insatiable appetite.
Method 1: Allocate RAM allocated using the Default Launcher
It is possible to allocate more RAM to the resources that Minecraft uses, even if the original, default Minecraft launcher has changed over time.
- To begin playing Minecraft, launch the game’s launcher and choose the version of the game you want to play (either Bedrock or Java)
- In the tabs at the top of this page, you will find links to several installation options. If no specific versions have been set up for you to play, it is conceivable that the most recent version will be the only one shown in the list of releases below.
- Click the three white dots on the right-hand side of the screen, followed by the word “Edit,” once you’ve hovered your cursor over it.
- You will be provided with a page that includes the name of the installation, the version number, and a few other choices. Click on the Install button to begin. When you click on them, a new set of options should emerge.
- Continue to scroll down till you reach JVM Arguments.
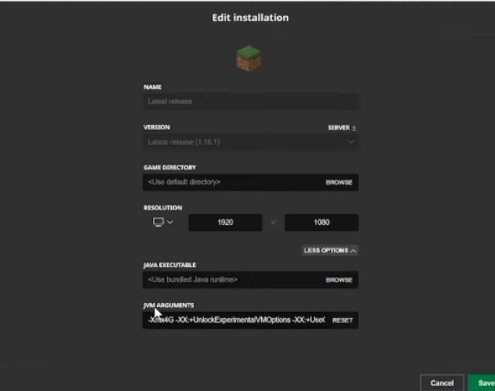
Minecraft uses a certain amount of RAM, as shown by the number at the end of this paragraph. You should replace the number “2” with the number of gigabytes of RAM that you want Minecraft to utilize.
However, even if it is possible to allow it to use all of the available RAM, whether or not it really takes advantage of the entire use depends on whether or not you have anything else running and open in the background at the same time.
Then, once you’ve finished making your adjustments, click Save and resume the game. Your performance should begin to improve nearly immediately once you begin to use this product.
Method 2: Allocation of RAM via the ATLauncher.
When it comes to Minecraft, if you’ve ever downloaded mods or spent a significant amount of time playing Sky Factory, you’re definitely already familiar with the ATLauncher. It is even easier to set aside extra RAM with the ATLauncher than it is with the default launcher, especially since it removes the need to interact with any code in order to complete the job at hand.
- By pushing the button, the ATLauncher will be launched.
- On the right-hand side of the launcher, there is a selection of options to choose from. The Java/Minecraft tab may be seen at the very top of the display screen. Select Settings, then Java/Minecraft from the drop-down menu.
- While there are a lot of options to choose from, you’re most interested in the second one, which stands for Maximum Memory/Random Access Memory, since it is the most useful.
- The amount you want to allocate may be typed in manually, but using the up and down arrows is the fastest and most convenient option. This changes the amount of RAM that has been allocated in 0.5 GB increments by increasing or decreasing the amount of RAM that has been assigned.
- Following your decision on how much RAM you’ll be utilising, save your changes by clicking the Save button. For example, if you are using a mod-heavy pack such as SkyFactory, you will need to allocate extra RAM to the game in order for it to run.
Method 3: Allocate RAM using the Twitch/Curse Launcher application.
Through the Twitch launcher, you may also participate in a variety of Minecraft customizations (as well as the original Minecraft game). This launcher’s configuration choices are identical to those of the ATLauncher described above, but the method of accessing those options is somewhat different.
- Choose Files and then Settings from the drop-down menu that appears in the top-right corner after clicking the three lines in the corner. The Settings menu may be accessed by using the CTRL + Comma key combination when the launcher is running in the background.
- After that, go to the Minecraft menu and scroll all the way down to the bottom of the screen to find the Save Game option. On the left-hand side of the screen, you will see a section labelled Java Settings.
- Move the slider to the right in the Allocated Memory section of the window.
- Increase or reduce the amount of RAM allotted to the game by moving the slider to either the left or the right side. RAM may be raised or reduced in 0.25 GB increments by sliding the slider up or down on the screen.
- As soon as you’ve achieved the required result by moving the slider, you’re finished. Then, go into your higher-performing game’s Mods menu and choose Minecraft in order to complete the assignment. Simply said, that’s all there is to it.
Increasing the amount of RAM available to Minecraft may (and in many cases will) increase the speed of the game; nevertheless, there are certain situations in which assigning too much RAM may result in a decrease in the overall performance of the system.
The operating system, for example, and other components of your computer need RAM as well. For non-gaming activities, it is usually recommended to set aside at least 1 GB of RAM, even if they have no major impact on the game’s performance when they are not running at the same time as it.
Method 4: Utilizing the Technic Launcher
When it comes to installing big Minecraft modpacks, the Technic Launcher, similar to the ATLauncher, is a popular choice. It functions in a similar way to the ATLauncher.
If you are familiar with the Technic user interface, it is assumed that you will be familiar with it. You may divide extra RAM for Minecraft using the simple capabilities of the program, as demonstrated here:
- Open your Technic Launcher and look for the little gear icon (Settings) in the upper-right area of the screen.
- The Java Settings tab may be found by choosing the gear symbol on the toolbar and then selecting the Java Settings tab.
- A drop-down option should appear, and you should be able to choose Memory. Simply click on it and choose the amount of RAM you wish to allocate. It’s important to remember that the enhanced gameplay needs at least 4GB of RAM.
- Your changes will be stored automatically without your involvement. To be on the safe side, let the Technic Launcher a few more seconds before shutting it down entirely to avoid any surprises.
Conclusion
If you’ve tried everything and still aren’t getting the performance you want, or if your computer is displaying an inaccurate amount of RAM—possible it’s that you have an issue with your RAM. It’s a good idea to check your memory every now and then to make sure you haven’t forgotten anything.
If you do have a problem with your RAM, the good news is that changing it is a simple procedure. In fact, if you want to enjoy even better speed, it’s worthwhile to consider increasing your system’s RAM, especially given the fact that memory prices are continuing to decline.
