MySQL is a free open source Relational Database Management System using Structured Query Language SQL, being the highly favorite language for content addition, access, and management of a database. It is highly recommended for faster processing, utmost reliability, ease-of-work experience, and flexible approach.
The utility of MySQL includes a broad spectrum of clients like e-commerce, logging applications, and data warehousing, but the commonest of all is web database creation.
It stores and manipulates data by emphasizing the relationship between the tables. Clients request the database thru pre-defined SQL statements to request-response information to get one on the clients’ side.
DATABASE () function shows the name of the running database, which is an active one. Queries are subject to getting results from and based on the running database. In MySQL, it is possible to substitute the function SCHEMA () with the function DATABASE ().
MySQL shell is an interactive tool to be used and act as an administrator of the MySQL database. Supporting JavaScript, Python, or SQL modes has made it convenient for access and administrative use.
SQL is a standard language enabling the user to manage and design databases whereas, MySQL is a relational database management system permitting the storage and retrieval of data from the database. MySQL, at times, uses SQL to perform some specific operations.
The easiest and most reliable way to connect to the MySQL server and get a MySQL databases list is by running the SHOW DATABASES command. Users can omit the -p switch, in case, the user has not set a password as a MySQL user. Users can establish a connection to MySQL Database by logging into the A2 Hosting account through SSH for which the user has to type the relevant command. The command needs some changes like:-
- Replace USERNAME with the username:
- MySQL -u USERNAME -p.
- Type the password at the Enter Password prompt, …
- Type the command at the MySQL> prompt: SHOW DATABASES, to get a display of the list of databases.
Launch the MySQL Command-Line Client.
For launching the MySQL Command-Line client, the user must enter the below-given command in the Command Prompt window:
MySQL -u root -p where -p option is required only in case of a root password has been defined for MySQL.
Users with a no-install package may use the instructions to install MySQL manually. Installing MySQL from a ZIP Archive package is as under:
Extract the main archive to the desired install directory
Users may also extract the debug-test archive, which is optional in case the plan is to execute the MySQL benchmark and test the software.
- An option file can be created using the following commands:-
- Choose a MySQL server type
- Initialize MySQL
- Start the server
- Secure default user accounts
PHP, Hypertext Pre-processor is an open-source widely-used scripting language to be executed on the server. Rasmus Lerdorf generated the initial version of PHP in 1994 to be utilized in managing session tracking, and dynamic content with a PHP database. PHP is also used in building e-commerce sites.
The Server is a part of computer hardware/software in computing to offer functionality for the programs/devices, referred to as “clients”. The whole architecture is known as the client-server model.
Upload max file size is the maximum size for files that are being posted. The types of POST body data are not subject to the limit. In case you wish to upload large files, you must increase both limits.
The maximum execution time in PHP is of 30 seconds. The phrase “maximum execution time” is vague as it may be taken as
(a) elapsed time since the script started, or
(b) the total CPU time taken by the script, including or excluding the CPU time taken by OSC.
The maximum execution time by default for PHP scripts is taken to be 30 seconds. PHP stops the script and reports an error in case a script runs longer than the maximum execution time. The amount of time PHP allows can be controlled by running the scripts for changing the maximum execution time directive in the php.ini file.
Client-Server Connection Ports
The default port used is Port 3306 for the classic MySQL (port) protocol. It is used by the MySQL Connectors, client, or for utilities like MySQL pump, and MySQL dump. The port supported by MySQL Connectors or MySQL Shell or MySQL Router for X Protocol (mysqlx_port), is estimated by multiplying 10 by the classic MySQL protocol port.
Increase MySQL upload limit
You have a 2MB limit of upload/import size in MySQL which is totally odd and highly inconvenient to import large files. Users can get the upload size increased by allowing and editing the server’s php.ini configuration file. Generally, it is located at /etc/php.ini in servers like CentOS.
To increase the MySQL upload limit on the server
Step 1:
Go to php.ini and find the following and change the values to a larger database size.
upload_max_filesize = 40M
post_max_size = 40M
Step2:
Restart the apache service for the new change to get set. Typically the command to restart apache would be: –
service httpd restartfor CentOs
service apache2 restartfor ubuntu
You can also restart directly from the path as:-
/etc/init.d/apache2 restart or /etc/init.d/httpd restart
In the case of shared hosting with no root access or access to the php.ini configuration file, then another way is: –
to create a .ht access file in the application root and then add the following line;
php_value upload_max_filesize 40M
php_value post_max_size 40M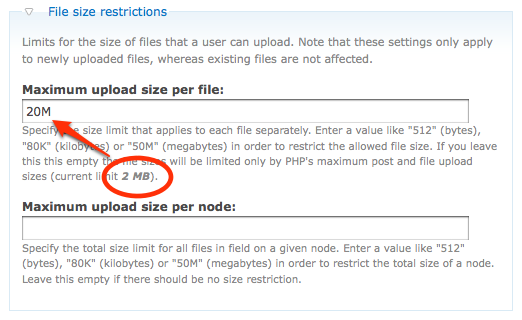
Increase the MySQL Max Upload Size on Server
The cPanel server puts a cap on the database to be uploaded into PhpMyAdmin. The default limit is subjected to 50MB.
Therefore, it becomes difficult to upload a large database to PhpMyAdmin. But, to increase the max upload size in the PhpMyAdmin of the database file, the user can make changes in configuration in the WHM of the server like: –
Step 1:
Login to the WHM of the server by accessing the link https://yourIPaddress:2087 Or https://yourserverhostname:2087
Step 2:
Navigate to “Server Configuration”.
Step 3:
Select “Tweak Settings” from it.
Step 4:
Navigate to PHP in Tweak settings.
Check cPanel max POST size and cPanel max upload size values.
Change the configuration according to the preference and save it.
Login to your PhpMyAdmin and verify the values, where you can see the value have been replaced with the changed one.
You can also go through the same procedure via the CLI:-
Step 1:
Login to your server via SSH.
# ssh root@IPaddressStep 2:
Execute the following command to display the default PHP .ini file of the server.
# php –iniStep 3:
Open it with your favorite text editor.
# vi path_to_php.ini (You may replace this with the original file path)Step 4 :
Search for upload and post by writing M, write the preferred value.
upload_max_filesize = M
post_max_size = M
Step 5:
Restart the apache service.
# service httpd restart or
# systemctl restart httpdYou may also like:
- How to Install Rust Installer on Mac?
- How to Install Hive on Windows 10
- How to Turn Off Windows Defender?
