There are a variety of reasons why capturing screenshots may be beneficial. Virtually all laptops, including Chromebooks, now have the ability to take screenshots, and they are accessible on virtually every model.

It may be a little bewildering for someone who is moving from a different platform to use a Chromebook, mostly because their keyboards are a little different from those found on windows or macs laptops, which can be confusing.
It has been decided to remove certain keys that were previously present on other computers in this configuration, while others have been replaced with new keys. Among the positive developments recently announced by Google is the addition of full screengrab capabilities to its search engine.
After that, there is only one step left for you to complete: finding the most effective method to take screenshots on a Chromebook.
Would it be feasible to snap a screenshot in Chromebook?
When you take a snapshot, you are capturing exactly what is shown on your computer screen. A screenshot is sometimes referred to as a snapshot or a screencap.
Despite the fact that it is a distinguishing characteristic, it is also very simple. Because of its ease of use, taking a screenshot is one of the handiest features that the modern computer era has to offer.
Suppose the following situation occurs: you’re putting up an instruction manual for your team on how to make use of a certain web application. Using a small picture to demonstrate what you’re talking about and how it works may be beneficial.
If you don’t want to use screenshots, you may write a long and wordy text, which, to be honest, is a bit redundant these days.
Furthermore, screenshots may prove to be very helpful in the case of a problem report being submitted. Providing a snapshot that shows what is wrong with an app is much more convenient when you are having a problem with an app and need to contact the IT team to resolve the issue.
Various devices run on a variety of operating systems, and providing visual assistance enables others to better comprehend what is going on and detect potential problems.
After reading this list, you should have a clear understanding of how important it is to take a picture in various circumstances. Most cellphones have this function, and it is available on the vast majority of them.
The method for capturing a screenshot, on the other hand, differs from one device to the next. A variety of ways for capturing screenshots on a Chromebook are detailed in the following section.
Best Way to Capture a Screenshot on Your Google Chromebook
Creating a basic Chromebook snapshot is a straightforward process. This method might be used, for example, if you wanted to capture whatever was presently displayed on your screen at a particular moment.
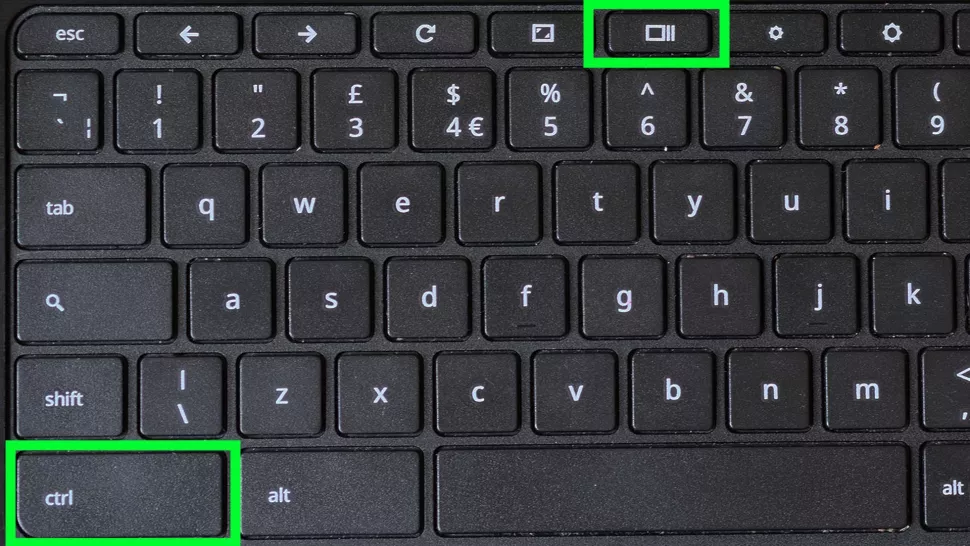
- To take a screenshot of everything that is now shown on the screen, press the keys listed below at once. If you hold down the Ctrl key and press the Show Window frames key, you will be able to view Windows.
- Normally, the latter button is located in the top row, between the fullscreen and Brightness Down buttons, as seen in the illustration above. It has the appearance of a rectangle with two lines, and it is most often used in lieu of the traditional F5 key on standard keyboards.
- Following the successful completion of the operation with both keys held, a notification appears in the bottom-right corner of the screen, displaying a thumbnail of the screenshot that was captured during the process. As a result of clicking on the thumbnail, you will be sent to the Downloads folder on your computer, where all screenshots are stored by default and may be seen even when your computer is not connected to the internet.
- If you want to recover screenshots, you may do so by choosing either Images or Downloads from the Shelf’s blue Files folder-style icon, which is situated on the right-hand side of the screen. Each and every screenshot captured on Chrome OS is tagged with the date and time that the screenshot was taken, for your convenience.
Because Chrome OS saves all of your data locally on your device, it is not possible to access Google Drive unless you manually upload screenshots to the cloud from your smartphone. Take the following actions to achieve your goal:
Step 1: Open the Files app and choose either Images or Downloads from the drop-down menu on the left side of the interface.
Step 2: Choose the screenshot you wish to submit. To upload several files at the same time, click on the check sign in each picture or draw a box around the files with a mouse or touchpad to select them all.
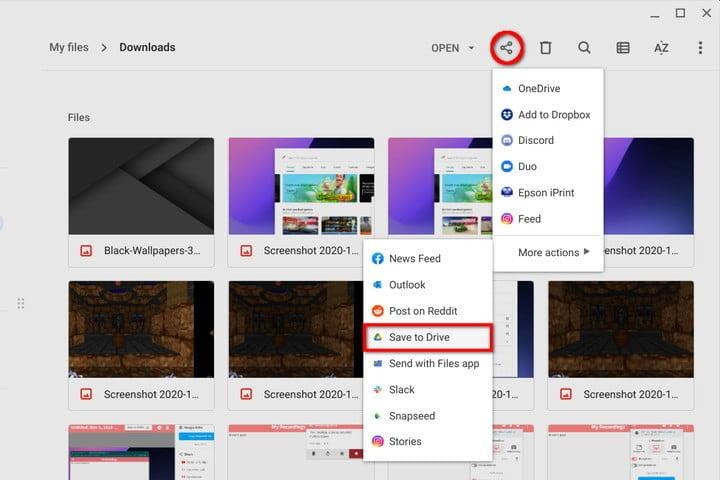
Step 3: Select “Share” from the drop-down menu in the top-right corner of the screen to share your work with others.
Step 4: In the Save to Drive drop-down box, choose the option. Alternatively, you may send the snapshot to other accounts, like OneDrive and Dropbox, as shown in the following example.
If you have a 360-degree Chromebook, such as the Pixelbook, you may jump forward to the ‘Tablet Screenshot’ section of this article for an alternative touch-based technology.
Take a snapshot of a specific area on the screen.
Apart from taking screenshots of the whole screen, you may also create a window to capture a section of the screen. Here’s how to go about it:
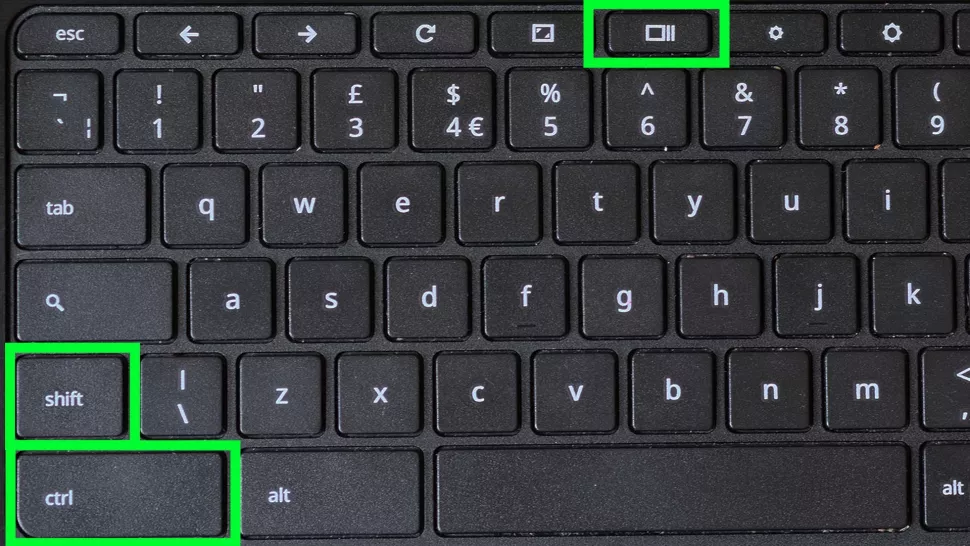
Step 1: The first step is to simultaneously press the Ctrl and Shift keys, followed by the Show Windows key.
Step 2: During this phase, the screen goes black, and the cursor changes to a crosshair for a brief period of time. To begin capturing, position the hair crosshair in the corner of your capture region and push the mouse or touchpad to start the capture process.
Step 3: Using your computer or your finger, drag the pointer around the screen until you have drawn a box around it. In order to complete the box and record the screen, you must move the mouse pointer or your finger away from the display.
Step 4: Images and downloads are stored in the same folder as the full screenshot, in the Images and Downloads folder.
Screenshots in tablet mode

Make use of the buttons on the Tablet
Some Chrome OS 2-in-1 smartphones and tablets, depending on their technology, may not provide instant keyboard access to the user. There is no need to be concerned since there is a simple screenshot shorthand you can use in tablet mode that will save you valuable time. Make simultaneous presses of the physical buttons on your tablet, which are: Power + Volume down.
The snapshot is captured and saved as a picture of the whole screen by your screen capture program. Make use of the stylus to capture the whole scene.
Here’s how to go about it:
Step 1: Take out the stylus and use it to press
Step 2: Using the stylus, choose Capture Region from the drop-down menu.
Step 3: Use the stylus to touch the screen and maintain your starting location on the screen.
Step 4. Drag your style to the endpoint and draw a rectangle around it.
Step 5: To capture a screenshot, press and hold the stylus for a few seconds.
How to take a screenshot on a Chromebook by copying and pasting the image into the clipboard?
You may emulate the behavior of Windows 10 when it comes to screenshots – that is, when you press the Print Screen key, the screenshot is copied directly to the clipboard rather than being saved automatically – by using your Chromebook in a similar manner.
Make sure to pay close attention to the notification that displays after you take a screenshot on a Chromebook since it will display the screenshot you just captured.
The capture is accessible for you to copy, paste, or alter in whatever image editor you are now using in any projects that you are currently working on once you click the button.
Alternatives that are Better
When it comes to capturing screenshots on your Chromebook, there are a variety of solutions available. But what if you had software that enabled you to do more than just take screenshots?
However, even if Chrome OS’s built-in photo capabilities are a bit limited, there are lots of applications and extensions available on Google’s Chrome Web Store that may help you get the most out of your device and make it more productive.
Using the app, you can not only capture photos, but you can also edit them, retrieve them, and annotate them at any time. To get you started, here are a few ideas to consider:
Lightshot: Lightshot is a simple tool that enables you to drag and drop a snapshot over any area of the screen, making it a great place to begin your photography journey. If you want to make modifications to the screenshot, you may do so before downloading or sending it to the cloud.
Fireshot: It is possible to save a complete page as a photo rather than taking multiple screenshots using the Fireshot feature of your browser. Saving them in a variety of formats and sending them straight to OneNote or email are also options accessible for you.
Awesome Screenshot: Awesome screenshot enables you to take a screenshot whenever you want, as well as the ability to record screencasting, which allows you to capture video whenever you want. It is a more comprehensive and powerful tool. Additionally, annotations and basic blurring are supported by the program.
Choosing Compatible android apps with Chromebook
As you may have noticed, Chromebooks in tablet mode include a screenshot shortcut that is quite similar to the one found on Android devices, as you would expect. Although there are some parallels, they do not stop there. Because Chromebooks come pre-installed with Google Play, you can use them to capture screenshots in the same way that you would on an Android smartphone or tablet.
Despite the fact that a significant number of third-party applications are compatible with Chrome OS, not every one of them is. Using the example of Screenshot Easy, not only works on Chromebooks but also has an interface that expands upwards to accommodate bigger displays. The editing tools from the app are included, as is a folder view that makes it easy to browse through a collection of screenshots.
Conclusion
Your Chromebook is likely to have a limited number of choices for capturing screenshots, so be prepared to be creative. In contrast, making use of a tool offers you an almost limitless number of helpful choices.
These tools make it simple to edit, annotate, and share your screenshots with the world! What matters is that you have the capacity to take and share screenshots, which enables you to preserve and share anything, from important business data to juicy gossip.
