Be it a computer or a smartphone, the user interface is a game-changer for all applications available. You like a specific action on the UI of one app and another action on the UI of another app. Imagine a situation where you want to show these different UIs to your team. Here you go with screen output in seconds. With a screenshot grab, one can exchange the image output to explain things better. Another usefulness of grabbing your computer screen is if you have encountered any issue or error. Your IT support team always asks for an image to understand it better. The Quality Assurance team in IT is the best example of using screen grabber tools to share with the development team. Nowadays, video recording also has become essential to show the UI behavior of the application or the specific screen of the tool.

In all of the above cases, it is necessary to know how you capture the user interface as an image output. In Windows operating systems, there are some built-in tools available for free with predefined features for editing the image. There are paid tools and also online tools available to take screenshots.
Methods to take screenshots in Windows 7 and Windows 10
There are multiple ways through which you can use to take screenshots in Windows 7 and Windows 10 from your desktop/laptop. Ten Methods are listed here.
- With PrintScreen (whole window) and Paint Image Editor
- Online Tool (screenshot.net)
- Try PrintScreen (part of the window) and Save in Word
- SnagIt – Image Capture Tool
- GIMP Tool
- Game Bar
- Digital Pen
- Snipping Tool
- Snip and Sketch Tool
Method 1 – Take Screenshot in Windows With PrintScreen
In this method, 2 utilities are being used. PRINTSCREEN and Paint.
- Activate the target screen of which the image to be shot.
- Use.
- Start Paint (from the Accessories menu)

- Do
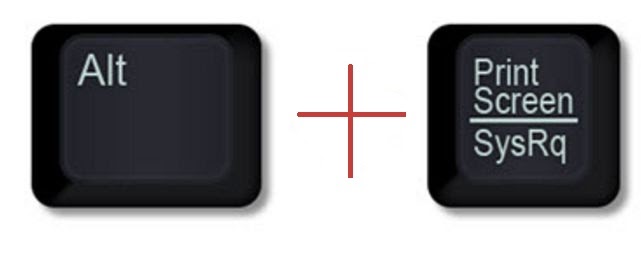 to copy the image output.
 - You will see the taken screen on the while blank screen shown.
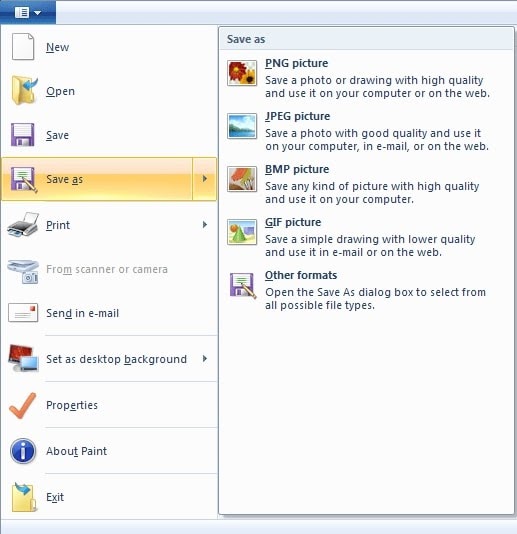
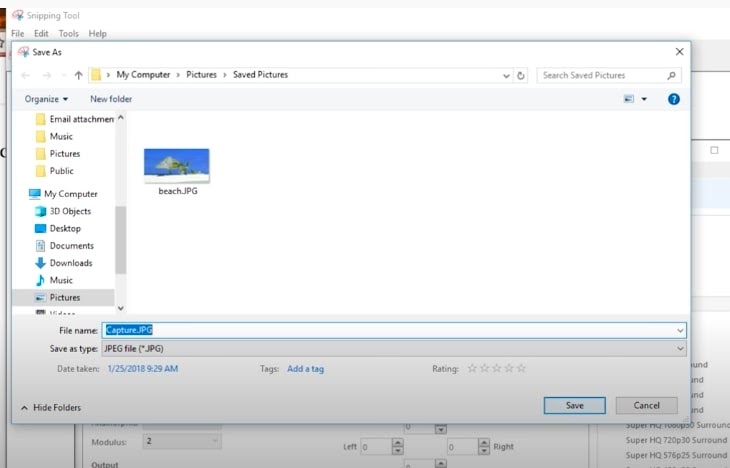
- Save the output in any of the below formats available.
- The output is as expected as the activated window on your desktop.
Method 2 – Take Screenshot in Windows Use of Online Tool
In this method, an online tool is used via accessing the browser. It is quick and available all the time without having it installed in your machine. It is free with minimum features.
- Start your browser. Access https://screenshot.net/.
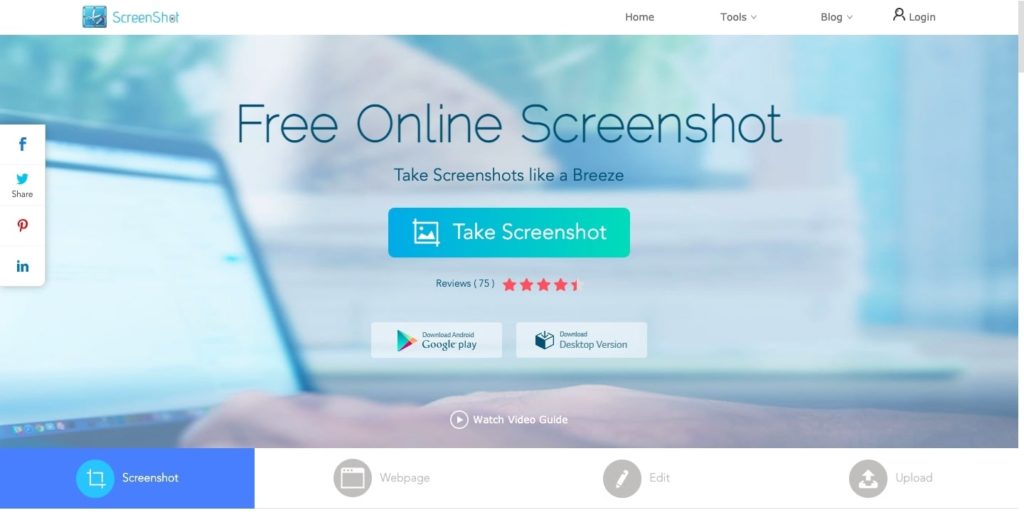
- The Take Screenshot button is located at the center of the web page. Use it to open the toolbar below.

- See the camera icon, 2nd from the top. Use it.
- Make the selection of image output you want to take using the mouse-click-drag-release action.
- You will find the snap taken.

- Choose the tools (Pen, Highlighter, Text) and many more options. Make the changes and save.
NOTE: The desktop version is available with more options such as choosing the screen modes, recording, and automatically taking the image instead of manually.
Method 3 – Try PrintScreen (part of the window) and Save in Word
In this method, 2 utilities are being used. PrintScreen and Word tool.
- Make a selection with the mouse-click-drag-release action.
- Do this :
- Start the word tool, and create a new document.
- Do “Ctrl+ V“to copy the image output.
- The image will be inserted in the document.
- Save to apply the changes.
- Share the document with others.
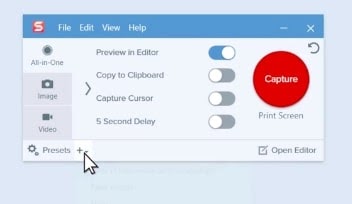
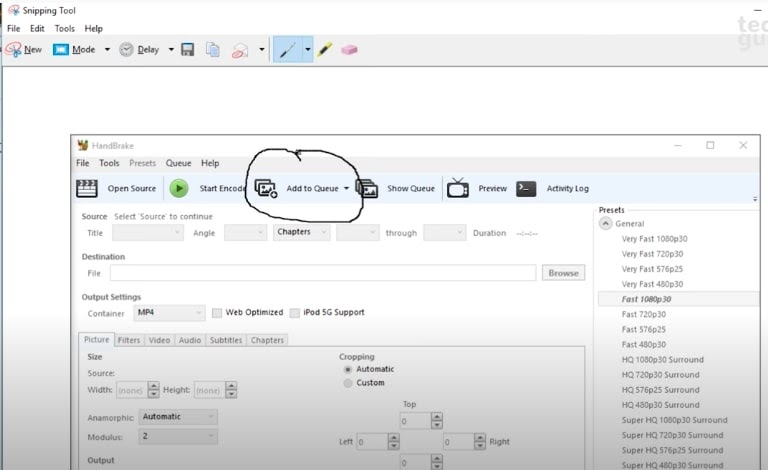
Method 4 – Take Screenshot in Windows SnagIT
This tool is used for professionals who use image-related stuff on a daily basis. Their work is dependent on such tools. It is very useful and efficient. The tool provides various predefined templates. Professionals can create their own template with specifications of taking the image output using presets.
- Download the tool from the TechSmith SnagIT website.
- Follow onscreen instructions and complete steps.
- On success, open the tool.
- To capture the whole screen:
- Activate the window or screen you want to take the image output.
- CTRL + SHIFT + P or a red-dot icon to grab the selection of an image. Alternatively, use

- The output will be opened on the home screen of the tool.
- Save the changes in the appropriate format.
- To take the output as a portion of the screen:
- Using the mouse-click-drag-release action, make a selection.
- CTRL + SHIFT + P or a red-dot icon to grab the selection of an image.
- The output will be opened on the home screen of the tool.
- Save the changes in the appropriate format.
- To grab the output content from the window having scroll:
- Open the tool.
- See the selection arrow in the image below.

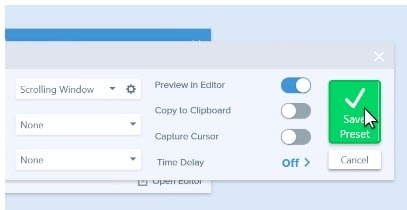
- Open preset with + icon.
- A new preset is the selection to make.
- Image → Selection menu as below.
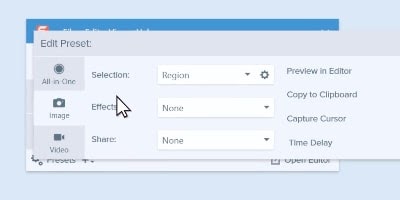
- Instead of Region, choose Scrolling Window.
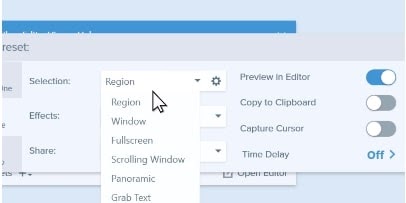
- Hit the green button as shown with the selection arrow in the image below.
- Now, perform the mouse-click-drag-release action to select the entire content with a scroll in a window.
- Save the changes with the auto-format set.
- Include the cursor in the image
- Open the tool.
- See the selection arrow in the image below.
- Switch on the Capture Cursor setting.
- Using the mouse-click-drag-release action, make a selection of image output to be taken.
- The output will be shown in the editor with the cursor shown.
- Save the changes with the auto-format set.
Read More: How to Stop Windows 10 Update in Progress
Method 5 – Take Screenshot in Windows GIMP
The tool comes with very basic image grab features. Either area or full window are the options one can find on this tool.
- Open the tool.
- Use the below menu options as highlighted in yellow.
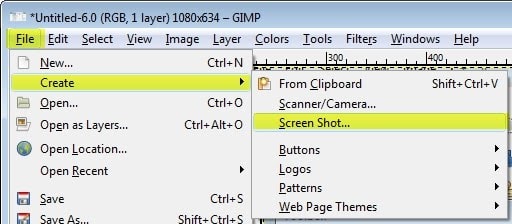
- You will see 2 options as below.
- For the active screen, use the option that is already chosen. For the entire screen (which contains multiple windows), choose the second option.
- Grab to set the option.
- Now, make the selection of the area using the mouse-click-drag-release action once the + icon appears.
- The image is grabbed and opened in the editor.
- Save your changes with the appropriate file format.
Method 6 – Take Screenshot in Windows Game Bar
- From settings, search by entering the keyword, game…The window is shown.
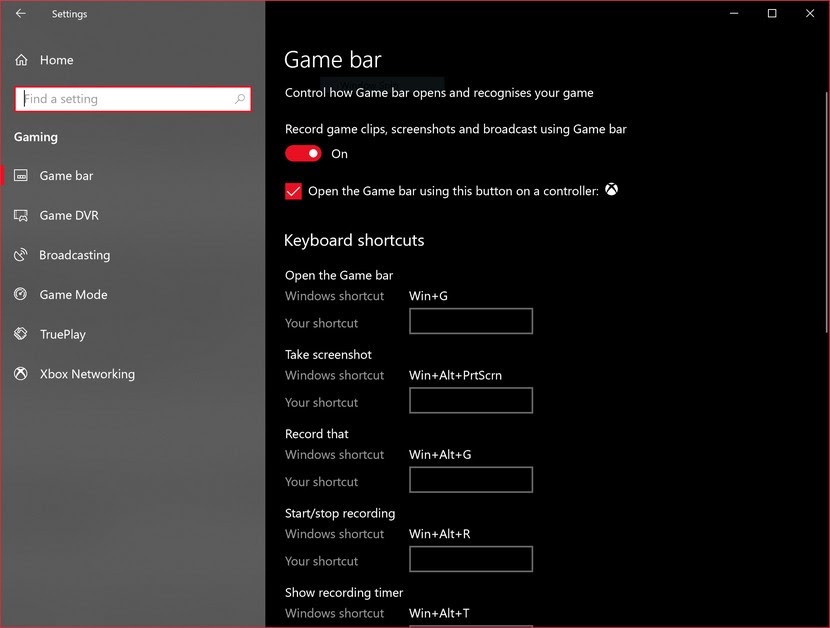
- Switch the “record game…….broadcast using Game bar” setting ON.
- Define the shortcut key for the “Take screenshot” setting. OR
- Use the default WINDOWS+ALT+PRTSCRN keys. The image grab is done.
- Do “Ctrl+ V” to copy the image output.
- You will see the taken screen on the while blank screen shown.
- Save the output in any of the below formats available.
Method 7 – Take Screenshot in Windows Digital Pen
Before pressing the tip of your digital pen, do the following steps:
- In the search bar at the bottom left, enter settings.
- In the settings, search for “Bluetooth & other devices” settings.
- Choose the Pen & Windows Ink option from the left pane.
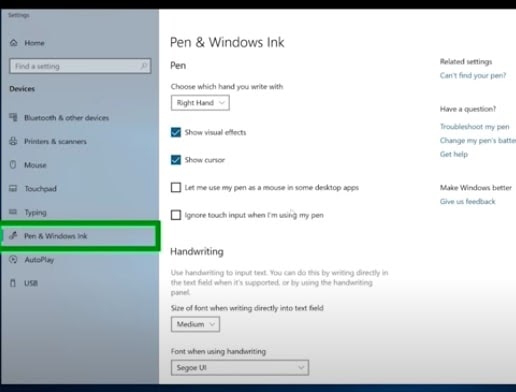
- Scroll down to pen shortcut options.
- Choose the Screen Snipping option.
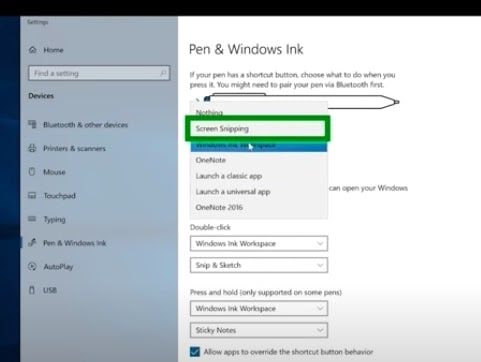
Once done, just press the tip of your digital pen and the full screen is captured. It is that simple and easy.
Method 8 – Take a Screenshot in Windows Snipping Tool
In-built tool is available in Windows 7 and Windows 10. Various grab options are available with the tool.
- In the search bar, type “snip..”. You will see the match with the Snipping Tool list item.
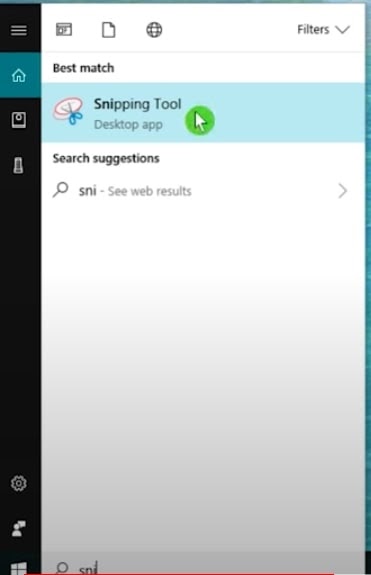
- ENTER to open the tool.
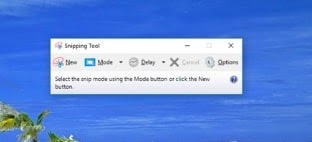
- Here you go! New is the selection you make. Before that, you can check the mode selected for your image output.
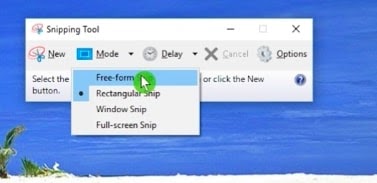
- 1st Option (Free-form snip) – highlight the image in a shape
- 2nd Option (Rectangular snip) – portion of the area selection in an image
- 3rd Option (Window snip) – to take the snap of the active screen
- 4th Option (Full-screen snip) – to take the snap of the whole window (similar to PrintScreen)
- Choose the 1st option and take the shot.

- Once grabbed, you can use tools to edit/update the image and save it.
- Similarly, use other options based on your image output requirement.
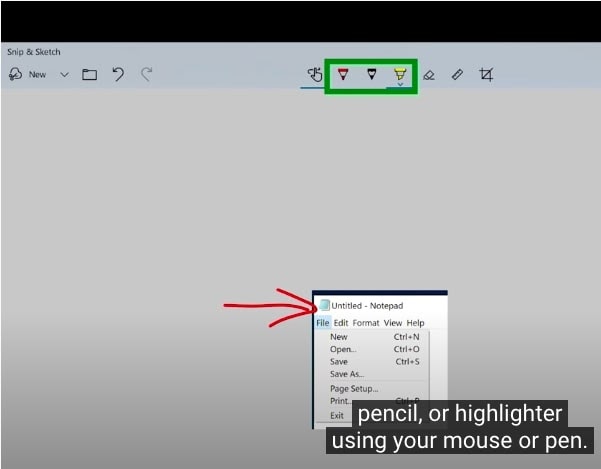
- Use the pen tool on the grabbed image:
- Highlighter: Next to the pen icon, you will see a highlighter. To highlight a certain part of the screen, use this option.
- Eraser: Use an eraser (the icon next to the highlighter) to clear the portion you have highlighted with the marker or the pen.
- After all, this, save your changes along with the image output.
- Choose the folder in which you want to save your image output.
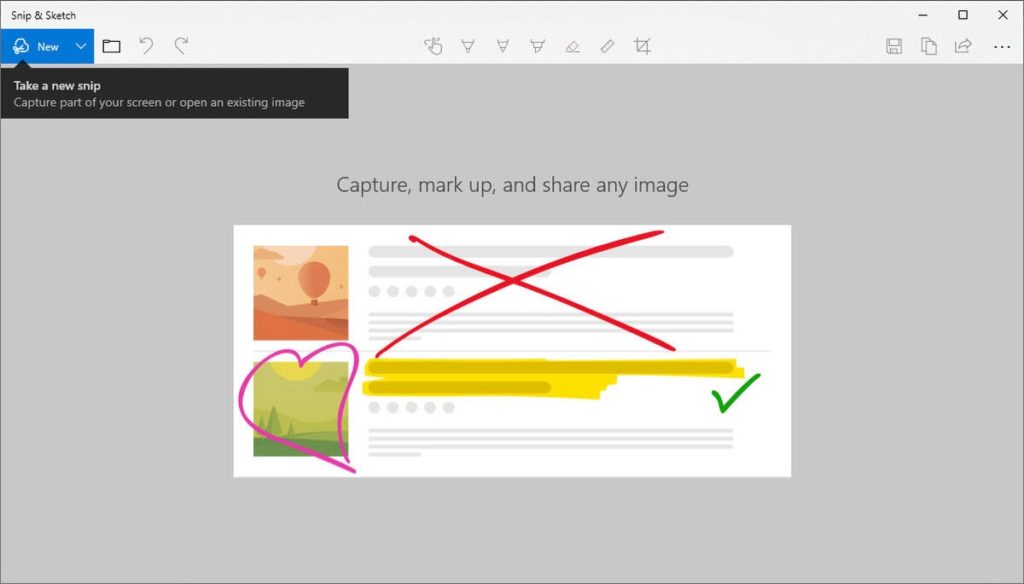
Method 9 – Take Screenshot in Windows Snip and Sketch Tool
This is an in-built tool available in Windows operating systems. This is very much similar to the snipping tool. All the options and actions are similar in terms of grabbing the image output.
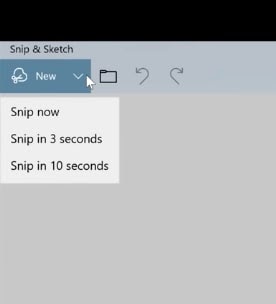
- In the search bar, type “snip &..”. You will see the match with the Snip & Sketch list item.
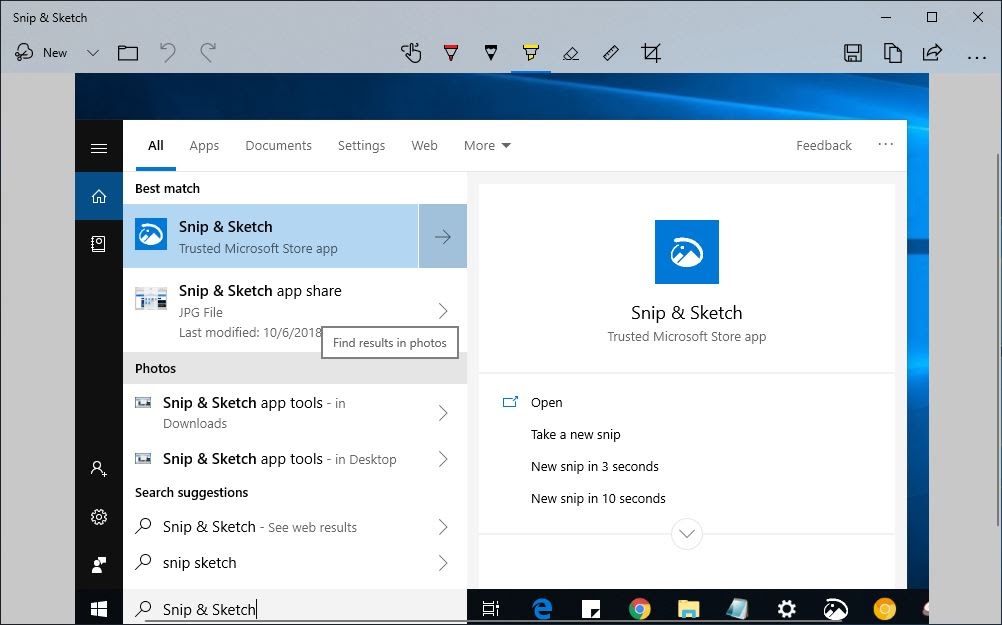
- Open it. The home screen of the tool is shown below. Use New to proceed.
- You will see the small bar as shown in the green border highlight. Different options can be used for grabbing the image output as per needs.

- Select the first option which is “Rectangle”.
- Make the selection using the mouse-click-drag-release action. The editor
window is shown where you will need to choose New.- Choose the option that suits your requirement.
- Once grabbed, you will see the image output on the home screen of the tool.
- Use the options to explain the image output. The options are highlighted in the green border.
- Use the editing options as per your requirement.
- Once done, save or copy or share the image output.

NOTE: To print the image output, click the 3-horizontal dots in the upper right corner.
Takeaway
All of the above methods are easily doable and quick to be performed. The time to grab the image output is an important factor to pick up the tool. Whenever the team needs to capture the screenshots on a daily basis for each ticket they log, it should be done in fractions of seconds. Tools play an important role in quickly grabbing the screenshot and proceeding with the next steps.
You may also like:
- How to Clone Windows 10 Without Losing Data?
- How to Flip Screen in Windows?
- How to Turn Off Windows Defender?
- How to Fix Copy and Paste Not Working in Windows?
