Sending out email notifications from any web app/mobile app is an integral part of communication with the customers. Notifications can be sent via different channels, such as email, SMS, WhatsApp or push notifications.
The email server setup is one of the operations and development tasks that can be set up and executed using scripts written in JavaScript or PHP or any coding language that your web/mobile app supports.
Below is an illustration of how sending an email server works with the SMTP protocol used by the email server hosted on the internet.
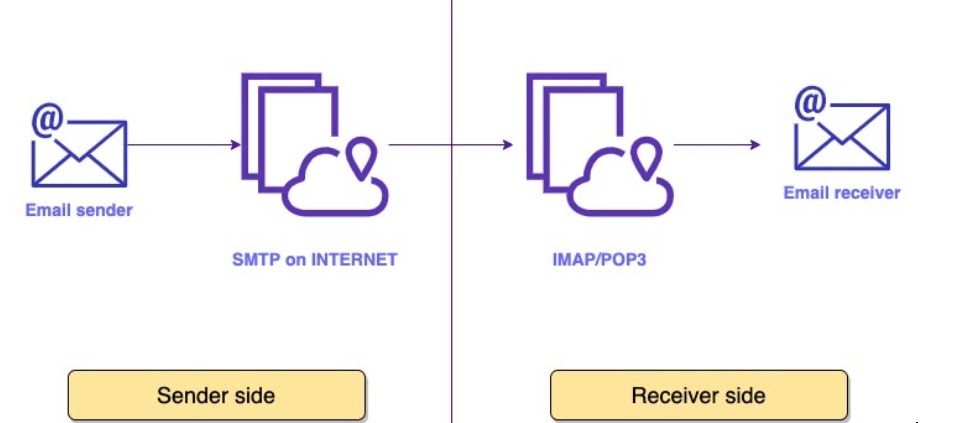
The SMTP protocol is nothing but the signal that connects your email software to a network. The network understands this sign or signal that it needs to forward the messages to recipients via the IMAP/POP3 server.
In the illustration above, the email message travels through intermediaries to reach a destination. The communication protocol (SMTP) is what these intermediaries understand to pass on the message.
Each email service provider has a limit to send out the number of messages per connection. This message limit depends on the SMTP that is used by the service provider. SMTP determines the limit of sending out email messages per connection.
Now, let us understand how the email process works with SMTP.
Email Communication (End-to-End Process)
- You open the browser and access your email account using Gmail or Outlook website. Create a message using the recipient’s email address, subject, and message body and hit Send. The action is initiated from the email client and connects to the domain’s SMTP server, for example – smtp.outlook.com.
The property on the Windows server will look like this:
SMTP=smtp.outlook.com- While connecting to smtp.outlook.com, the request is sent with the sender’s email address, message text, and recipient address.
- The SMTP takes the route further to reach out to the receiver’s domain with the message. There are two scenarios in this.
- SMTP’s domain and Recipient’s domain server are the same – In this, no routing is needed between the servers.
- SMTP’s domain and Receipt’s domain server are different. – In this, routing is needed to reach out to recipients’ DNS (Domain Name Server)
- In the case of the second scenario above, the SMTP server searches for the receiver’s DNS and converts it to an IP address that is bound to the DNS. Once the IP address is determined by the SMTP server, the message is sent efficiently to the receiver’s SMTP.
- The recipient’s SMTP server recognizes the incoming message from DNS and the IP address and forwards the message to the recipient’s IMAP/POP3 server.
- The receiver’s email client processes the IMAP/POP3 request and the message is available in the recipient’s mailbox.
Now, we will see how to send emails in PHP.
How to Send a text email in PHP
Before writing a script for sending an email in PHP, the first thing to do is to configure the php.ini file located in your /etc folder of the PHP server. This is the hosting server where your application/website code is deployed.
NOTE: It is recommended to download the repository on your local machine and make the changes. Once done, you can push your changes in Live.
You will get the SMTP connection details such as authentication credentials from your hosting service provider. In addition to that, please map your domain with the SMTP server IP address as a part of the DevOps setup. Mostly, the setup server is an Apache server.
Below parameters and values need to be set in the file.
- Configure the php.ini file in your Windows production server.
- Open the file in notepad. Edit the parameters below.
- Enter the SMTP server’s address as below.
- Enter the email address from which the email is to be sent.
SMTP=smtp.outlook.com
[email protected]
To set up the same on your local (DEV) environment,
- Enter the SMTP and port entries as below. NOTE: Remove semi-colon prior to the entry.
SMTP=smtp.outlook.com
smtp_port=587
Once configured, the next step is to use the Sendmail() function in your testingsendmail.php file.
- Open notepad++. Name the file as testingsendmail.php.
- Enter the below code in the file. Below are the mandatory parameters for which the values should be available in the script.
<?php
$to_email = '[email protected]';
$subject = 'Thank you for using our services';
$message = 'Your transaction is successful with {companyname}';
$headers = 'From:[email protected]';
mail($to_email,$subject,$message,$headers);
if(mail($to_email,$subject,$message,$headers))
{
   echo “Your message is sent successfully.”;
}
else {
 echo “Sorry, we could not send this message.” ;
 }?>
NOTE: We have done exception handling by entering condition and show the error message if the message sending is NOT A SUCCESS.
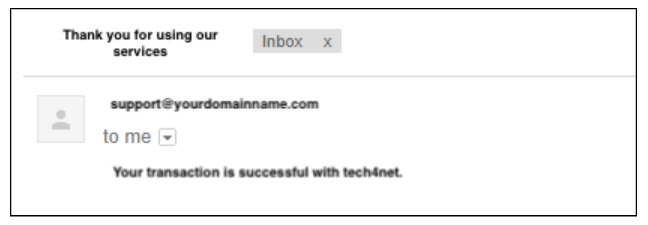
- The output of the email will look like this:
We have seen sending a simple text email. Now, let us see how we send a mail format in an HTML file embedding the PHP script.
Send HTML Email in PHP
To embed a PHP script in an HTML file, you will need to understand the MIME type that is used to format the text on your email. MIME’s full form is Multipurpose Internet Mail Extensions.
You can configure the SMTP server as described in the section above. Follow the steps below to send an email using an HTML file.
- Create testingsendmail.html using notepad.
- The below code snippet is an HTML file in which PHP code is written to send an email to the recipient(s).
<html>
   <head>
    <title>An HTML eMail Format for your knowledge</title>
</head>
      <body>
      <?php         $to = "[email protected]";
   $subject = "Thank you for using our services";
                $message = "<b>Your transaction is successful with Tech4Net.</b>";
     $message .= "<h1>Your Transaction Details: INR 25,000.</h1>";
                $header = "From:[email protected] \r\n";
      $header .= "Cc:[email protected] \r\n";
        $header .= "MIME-Version: 1.0\r\n";
  $header .= "Content-type: text/html\r\n";
            $setvalue = mail ($to,$subject,$message,$header);
           if( $setvalue == true ) {
    echo "Your message is sent successfully.";
   }
else {
       echo "Sorry, we could not send this message.";
    }
   ?>
  </body>
</html>- Save your HTML file and try sending an email to check whether it is sent successfully.
Let us understand how to prevent spamming of emails that you get in the form of an inquiry form available on your website and you are auto-sending the reply to them as “thank you for your inquiry.”
To send secure emails from your SMTP server, there are some validations written. The filter_var() function is used for the validation of user data or inputs.
- Create testingsendmail.html using notepad.
- The below code snippet is an HTML file in which PHP code is written to validate an email before sending it to the recipient(s).
<html>
      <head>
      <title>An HTML eMail Format for your knowledge</title>
 </head>
    <body>
         <?php
  function validate_email($fieldname) {
  $fieldname = filter_var($fieldname, FILTER_SANITIZE_EMAIL);
  if (filter_var($fieldname, FILTER_VALIDATE_EMAIL))
{
 return true;
   }
else
{
   return false;
   }
}

  $to = "[email protected]";
     $subject = "Thank you for using our services";
         $message = "<b>Your transaction is successful with Tech4Net.</b>";
    $message .= "<h1>Your Transaction Details: INR 25,000.</h1>";
      $header = "From:[email protected] \r\n";
  $header .= "Cc:[email protected] \r\n";
     $header .= "MIME-Version: 1.0\r\n";
     $header .= "Content-type: text/html\r\n";
              $setvalue = mail ($to,$subject,$message,$header);
               if( $setvalue == true )
{
    echo "Your message is sent successfully.";
    }
else
 {
       echo "Sorry, we could not send this message.";
        }
  ?>
      </body>
</html>
Below are the in-built parameters used to validate recipients’ email addresses and send them securely.
- The “SANITIZATION TYPE” parameter is applied to the field to check sanitization.
- FILTER_VALIDATE_EMAIL – To check whether the email address is valid or invalid. It returns false when the email ID is invalid.
- FILTER_SANITIZE_EMAIL – To eliminate/ignore unsupported characters from email addresses. For example info]@yourdomain.com. It will remove ] from the email
- FILTER_SANITIZE_URL – To eliminate/ignore illegal characters from the email address.
- FILTER_SANITIZE_STRING – To eliminate/ignore tags from the string or text.
- Save your HTML file and try sending an email to check whether it is sent successfully and securely.
You can also send emails using the Gmail SMTP server with PHPMailer. Let us see a quick snapshot of the process to send the email.
- Download the PHPMailer library from https://github.com/PHPMailer/PHPMailer/releases
- Download the package as zipping. Reference screenshot below.
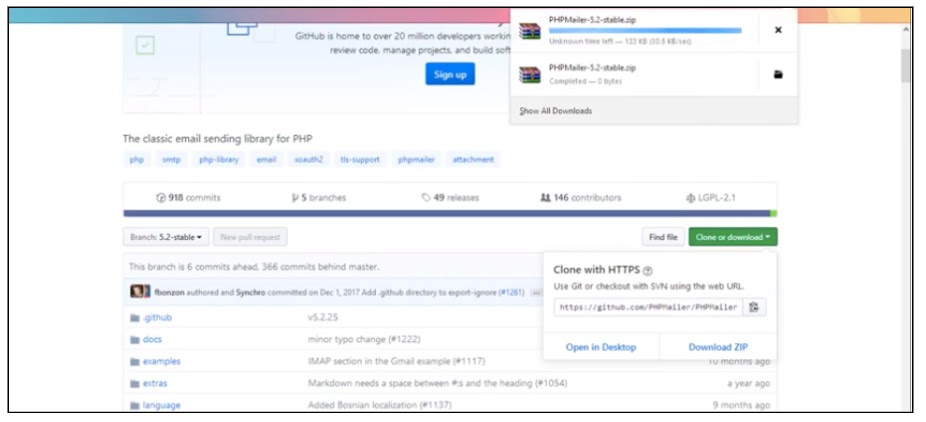
- Download the package as zip. Once downloaded, extract the zip.
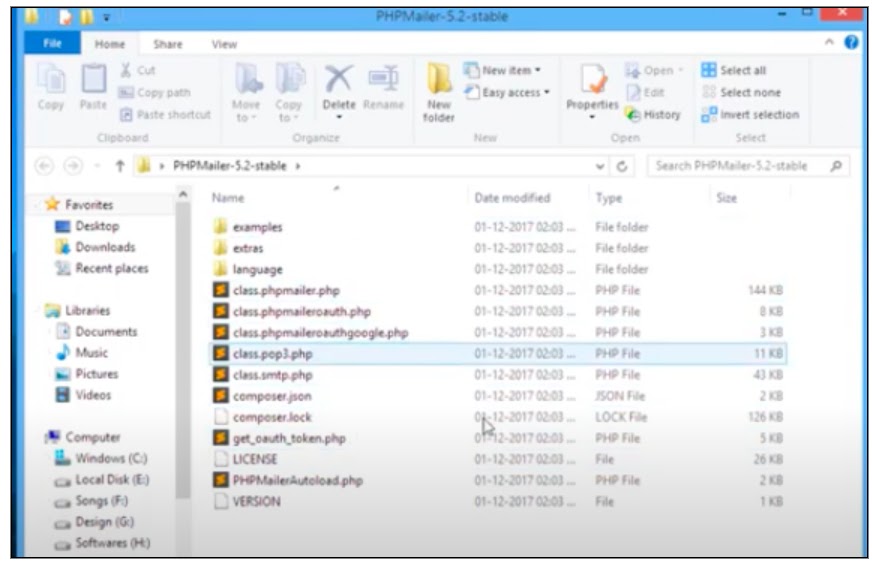
- Locate the below files.
- class.phpmailer.php,
- class.smtp.php,
- PHPMailerAutoload.php
- Create a new folder Mail → PHPMailer as a subfolder and copy all the 3 files in this subfolder.
- Create a new file, index.php in the Mail folder.
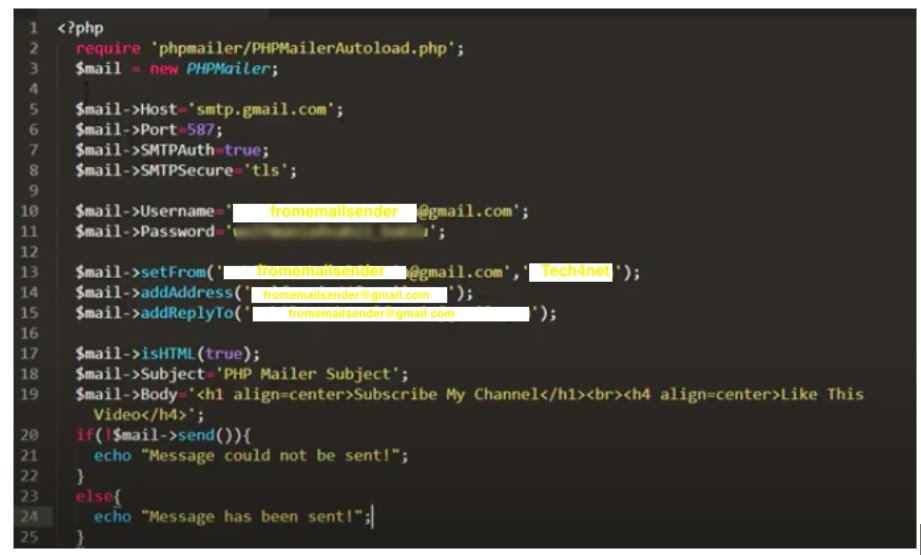
- Enter the code for Gmail SMTP server details, hostname, port, and authentication parameters.

- Now, enter the email-related information in the continuation of the code. Specify the username and password of the Gmail account you are using.
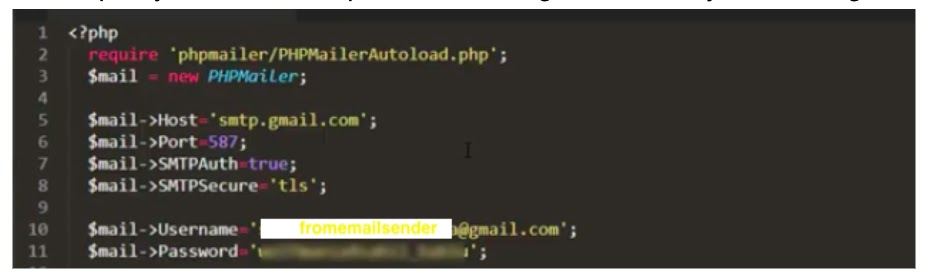
- Specify the sender email address in the set from, address, and add reply-to fields.
- Then, specify the email format and text of the email.
- Add a line below $mail = new PHPMailer; with $mail = isSMTP(); if you are using localhost.
- When you want to deploy in production, comment the line as //$mail = isSMTP();.
- Upload the PHPMailer and index.php file on your live server.
- Go to your Gmail account. Check the below points.
- Make sure your 2nd-factor authentication is OFF in sign-in security.
- Allow the less secure app option as ON.
After performing the above steps, you will be able to successfully send out an auto-email from your Gmail account.
Setting up an SMTP server and sending emails using PHP script is a Joint Activity of the DevOps and Developer teams.
You may also like:
How To Unarchive Gmail Emails – Archive
How to add POP/IMAP email with Gmail
