Gaming is one of the activities that has gained popularity among kids in recent years. Today’s generation of kids is more on indoor playing than outdoor games. Video games have captured the majority of the kid segment across the world. Having said that, it improvises their creativity, problem-solving and logical skills. Gaming is the trend nowadays and it will be!

What is a Minecraft server?
Minecraft server is a gaming server that supports multiplayer games with building cities or towns with blocks (LEGO), fighting in a war, or solving block puzzle games. All of these multiplayer gaming platforms and objectives can be achieved using the Minecraft server.
Setting up the Minecraft server on various platforms (macOS, Linux, Windows) is a little critical as it involves network settings, firewall settings, and configuration parameters of the Minecraft server.
All of the above activities will be covered in this blog.
Minecraft server (Windows platform)
To install the Minecraft server follow the below steps but before we step into the installation process, let us understand the prerequisite tools required for the successful setup of the Minecraft server.
Prerequisites
The basic preferred requirements for setting up the Minecraft server on a Windows machine as listed below. It includes software, hardware, and network requirements.
| Software Tool Requirements | Java 8 JDK |
| Minimum Hardware Requirements | Intel Core i3/i5 3.5GHz / AMD A10-7800Hard Disk Drive – 4GB RAM – 4GB minimum note: If you want to use the same machine for operating games, RAM should be 6GB+Graphic Card – HD 4000 / Nvidia 400 Series or AMD Radeon HD 7000 series with OpenGL 4.4NOTE: The higher the configuration the better the experience |
| Network Requirements | High-speed Internet connection (min. 50mbps) |
| OS (operating system) Requirements | Windows 7 and above (Windows8 or 10) |
Check Java 8 JDK is installed
NOTE: You may skip these steps if Java is already available in the system.
- First, check the availability of Java in the system by exploring the Control Panel.
- Locate/Find or Search by entering the java keyword from the Programs and Features section.
- If available, go for Update Now.
- If not available, download from the http://www.oracle.com/technetwork/java/javase/downloads/index.html link.
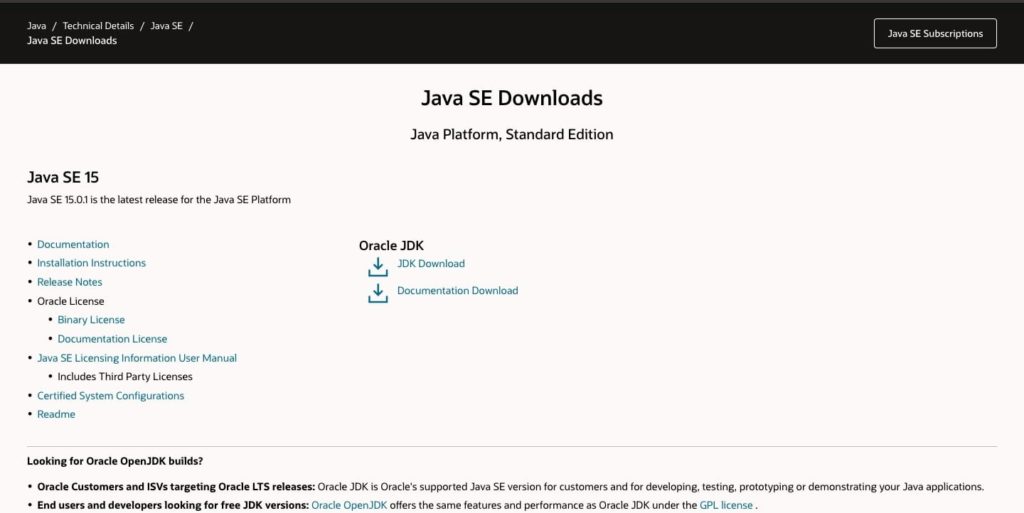
- JDK Download is the link to be pressed. It will start to download. The package is downloaded in the default download folder.
- To start the installation, double-click the package file.
- Installation is initiated.
- Upon completion, the Java icon sits on the taskbar of the system.
- javac -version is the command to be executed on the command prompt window.
NOTE: Version information is available for you to verify.
- It adds to your knowledge on the decision to update the Java version or not.
How to install the Minecraft server in Windows?
- The https://www.minecraft.net/en-us/download/server/ link (from the Web browser) to be opened.
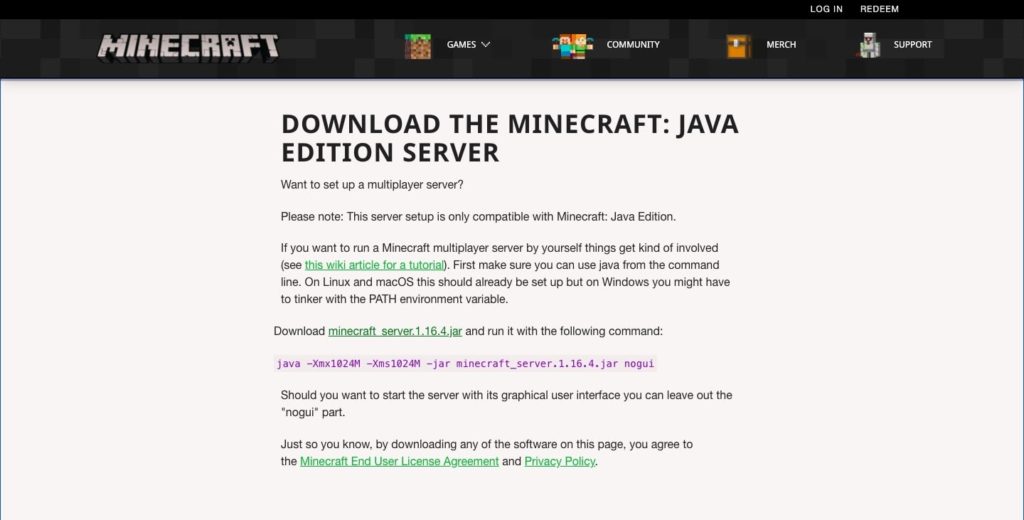
- The jar package hyperlink (minecraft_server.1.16.4.jar) is located on the 2nd paragraph of the page.
- In the command line window, execute the command same as displayed below.
java -Xmx1024M -Xms1024M -jar {minecraft_server.x.xx.x.jar} noguiNOTE: To run the UI Wizard installation, remove the nogui keyword from the text of the cmd. The jar filename may vary based on the version. Put the actual filename without curly braces.
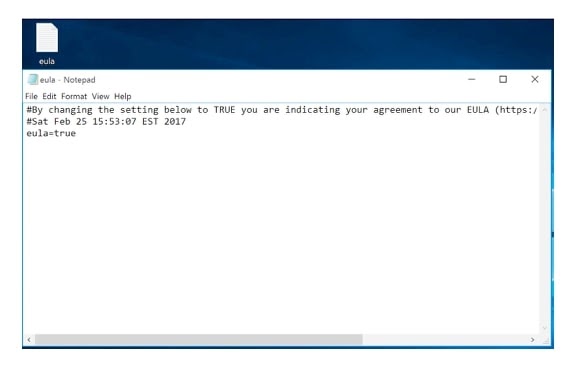
- The EULA file is extracted and opened in a plain text format. The property “eula=false” is shown.
- Change it to “eula=true”. Save your changes in the file.
NOTE: Setting this property to true means you agree to terms and conditions for installing the Minecraft server. The importance of this step is to keep the server running. If it is kept as false, it will shut down immediately when you try to start it.
- Time to set the server properties file by specifying the port, memory, and other settings.
- port = 25565
- Once the config properties are set, run the jar file again to start the server instance.
NOTE: For more information, refer to the configuration section for it.
- Allow the Minecraft server access which is blocked by the firewall.
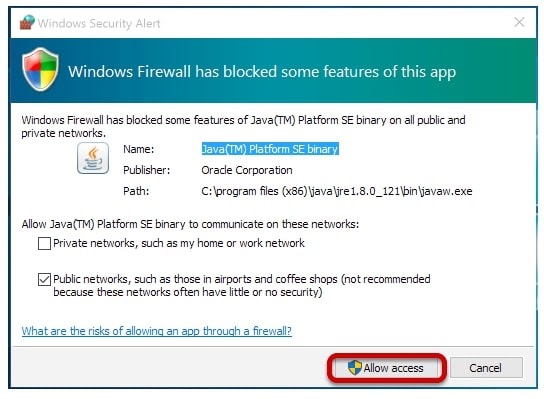
- The Minecraft server is ready to rock.
- Let us see how to start:
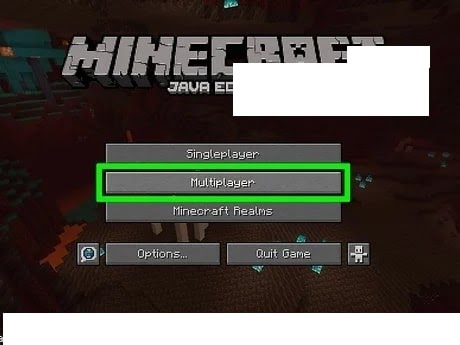
- Start the user interface by pressing the shortcut icon.
- Choose Multiplayer.
- Add Server is the option to be chosen for setting up network details.
- Enter Minecraft server details. (Name, IP Address). Done.
- The connection is established as required. From there on, you can join the server you have configured. Whenever there are changes in IP address, the connection might fail. Explore the following sections for more information on this.
Port Forwarding
Playing with the multiplayer mode, it is required to share the Minecraft server’s access with fellow players. The co-players to access your PC for playing the game, this step is required. The port forwarding is done on the Internet router settings page from the Web URL.
You may be asked to specify the following details to create a port forwarding rule with the following details.
- Rule name = minecraft
- Type = TCP/UDP
- Port = 25565
- IP Address = your IPv4 Address
NOTE: You will find the IPv4 address by hitting the ipconfig command using the terminal.
- Leave all other details blank.
NOTE: Port forwarding mostly should be avoided due to security risks. Opening a port on the network can be dangerous for your system attacked by the resources.
How to Installation a Minecraft server on macOS and Linux?
NOTE: If Java is installed in your system, you may skip the steps below.
Install Java using the Terminal window
- Java version to be checked on the system.
- Use a terminal for checking. (It needs to be above 1.6)
- Enter – java -version. ENTER.
- The version shall be shown by the execution of the above cmd. If not, perform the following.
- Install Java. The command to enter is: bin/bash -c “$(curl -fsSL https://raw.githubusercontent.com/Homebrew/install/master/install.sh
- Press ENTER.
- Next command: brew cask install adopt OpenJDK
- Press ENTER.
- Wait for a while. Once done, enter java -version again. ENTER.
- You will be seeing the Java version installed.
How to Start Minecraft server in macOS/Linux?
- Download the jar package.
- Start terminal window.
- Create the script file “start.sh” and paste the code as shown below.
#!/bin/shcd "$(dirname "$0")"exec java -Xms1G -Xmx1G -jar {minecraft server.jar} --noguiNOTE: Put the actual jar name {minecraft server.jar} without curly braces.
- Save the file and execute the same by using the command as follows.
chmod a+x start.shNOTE: Alternately, the script file can be executed by double-clicking it.
- The server is ready to use.
Establish VPN Connectivity for Multiplayer
Virtual Private Network (VPN) is an alternative way of port forwarding and a safe way to play with the multiplayer option. All you need to do is create a connection and share it with the co-players.
There are paid solutions as well as free VPN. Free solutions are Hamachi or Radmin. Hamachi allows only 5 connections per VPN whereas Radmin has no limits on connection. We will see how to set up a Radmin VPN for multiplayer solution in the Minecraft server.
NOTE: If you already have a VPN, you may skip the download and installation steps and move to establish the connection section.
- Visit the https://www.radmin-vpn.com/ website.

- You see the Free Download capsule button.
- Once the download is complete, follow onscreen instructions to install the package.
- On the desktop, a shortcut icon is created.
- Open it and choose the Create Network option. Set the following details.
- Network Name = Any name that you want to give
- Password = Set a strong password for the network you are creating
- Confirm Password = Repeat the same password.
- Hit Create.

NOTE: Make sure the Allow sending connect requests without a password box is unticked.
- The newly created network is displayed.
- Invite friends by sharing your VPN details.
- You are ready to go for Minecraft play.
- Next, establish the connection:
- Start Minecraft server.
- Choose Join Network from the settings.
- Enter the network name and the password you have set for the VPN.
- Hit Join. You will see the instances in the network.
- You can connect to the host.
- In case you fail to see your co-players in the network, there might be issues with firewall settings in your local system. Allow them to enter in changing the firewall settings.
NOTE: You may want to disable the firewall.
- You are all set to start playing with your game buddies.
How to configure the Minecraft server?
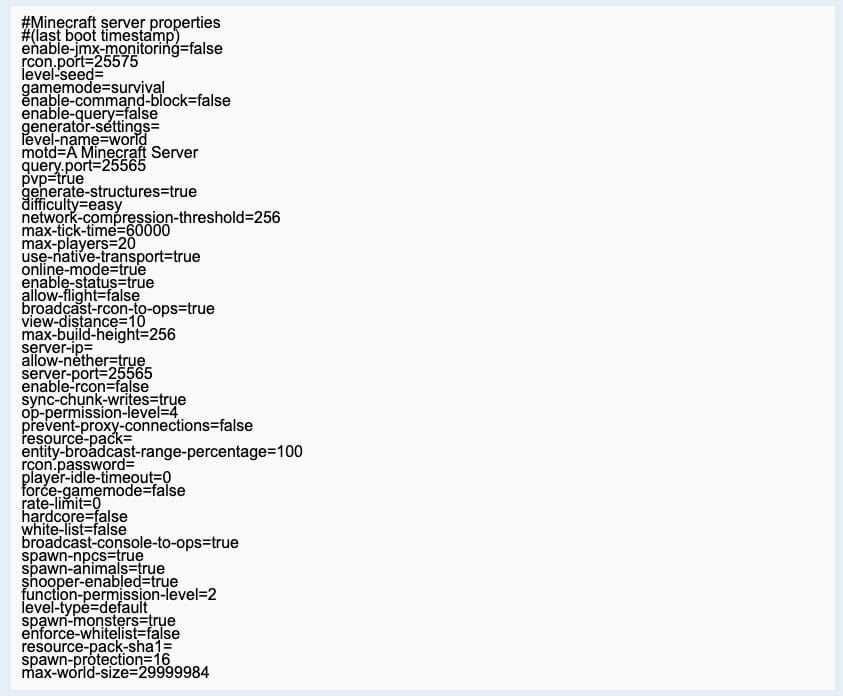
Default server configuration usually works for regular gaming processes. Usually, it does not require updating the server.properties file once your Minecraft server is all set to go.
Here are the default values set in the Minecraft server configuration.
Another configuration parameter is ops.json file. For the user who wants to become an admin for adding an operator or becoming an operation, a code file needs to be configured as below.
NOTE: Owning operator rights allows you to control some gaming actions such as teleporting co-players.
- In the console, enter the command:
/op {playername}NOTE: This will add the username and UUID of the player name in the ops.json file.
- The ops.json file will have the following specifications as below.
[ { "uuid": "xxxxxxx-xxxx-xxxx-xxxx-xxxxxxxxxxxx", "name": "username", "level": 4, "bypassesPlayerLimit": false }]- The change in UUID and username in this file will not reflect as you already added the player name in the console.
Another configuration parameter is the whitelist.json file. This is related to your server.properties file in which you have enabled whitelisting. If not, the first thing you need is to update the server.properties file.
- Update the below property to “true” in the server.properties file.
- White-list = true
- Next, add the player name using the console with the below command:
/whitelist add {playername}NOTE: It is advised not to update the whitelist.json directly, but use the above command.
How to connect the Minecraft server to start the game?
You have installed the server, created the network, set up the configuration and now the last step would be to connect to the server. You will be in a position to just start the game with your co-players.
- Follow the steps if your Minecraft server is set up in the same machine from which you are starting the game,
- From Minecraft UI, choose Multiplayer.
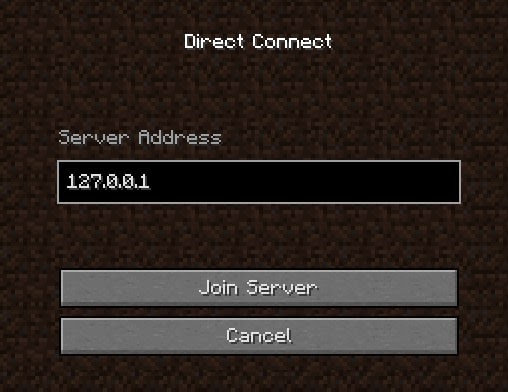
- Tap Direct Connect.
- Enter the “localhost” instead of the IPv4 address.
NOTE: It is advised to have a remote machine to set up the Minecraft server and a local machine from which you are going to connect to the server and start the play.
- Follow the steps if your Minecraft server is remotely set up and you are connecting from your local machine,
- From Minecraft UI, choose Multiplayer.
- Tap Direct Connect.
- Enter the IPv4 address.
- Make sure the server.properties are configured with the port number 25565.
NOTE: You are all set to go with this and start playing games with your buddies.
Additional Information on IP Address
As explained in the above section, the Minecraft server is located remotely, the IP address changes dynamically if you do not have the static IP Address from your ISP (Internet Service Provider). When the players connect to your IP address, they may fail to connect to it due to frequent changes in the IP address. The resolution to this is to map/bind a domain name with the IP address.
Takeaway
Gamers are constantly exploring options to play online and learn installation, setup, configuration, and network changes to achieve their gaming objectives. Multiplayer games are very well covered in this article. Minecraft server installation and setup are all we have covered. You can get all the steps covered by the Minecraft server.
You may also like:
- How to Run Script Using Windows Server
- How to Install Server Nginx on Ubuntu
- How to Set Cron Job on Linux Server
- How to Setup AWS EC2 Server