HTML is a “must” language when it comes to Website development. Your website/page layout and structure are created using HTML. Using HTML, you can present your content in a way you have prepared our web page layout.

HTML5 is the most recent version where you can handle certain behavior without relying on JavaScript. This version of HTML has a wide range of elements and attributes that can be used for modern website development.
Working with HTML
Let us understand how we work with creating layouts using HTML5. The basic steps to create an HTML File for your website.
- Create a folder structure in your local drive. (Drive C: or D:)
- Create the folder <website_name>. For Example: transpire.in
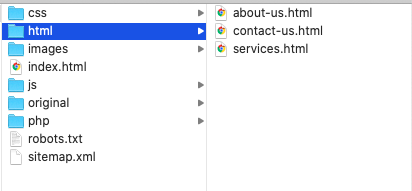
- Under this folder create the below folders.
- css
- html
- images
- js
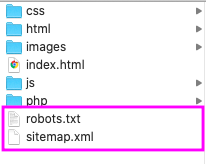
- Create the below files in <website_name>.
- robots.txt
- sitemap.xml
- index.html
- Create index.html as the homepage of your website.
- Open notepad. Save the file as index.html.
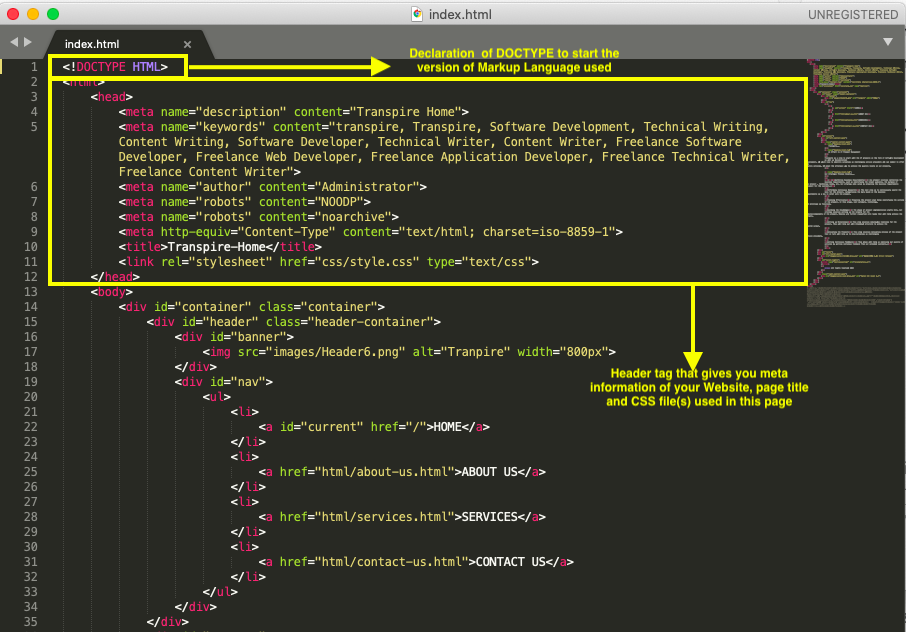
- The first thing you will do is a declaration of DOCTYPE.
- <!DOCTYPE HTML> – This tag states the version of HTML you are using in your Website. This is a must to start your HTML layout.
- <head> – This tag contains all your meta information with your context of the website, page title, and css file(s) that are used on this page.
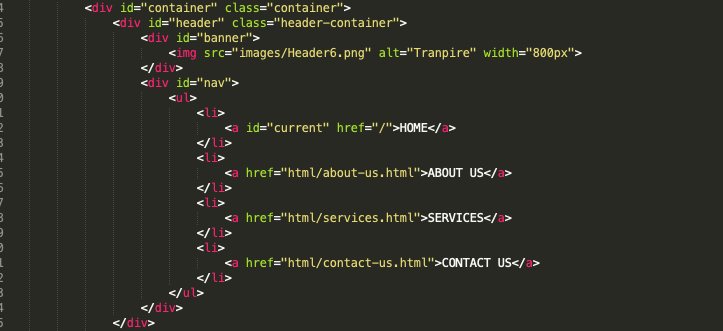
- <div> – This tag contains the block that you have specified in your css. For example – If your website has a top menu bar, its placement and dimensions are defined in the css file. For 2 columnar structures of the content, a separate dimension and position is defined for another block. Each block is a div with a specific name given and that will be used in an HTML file.
- In the example above, “banner” is the header that contains an image.
- The <div> = “nav” is the menu bar where you will Home, About Us, Services, and Contact Us pages available. Each page is hyperlinked with an HTML file extension.
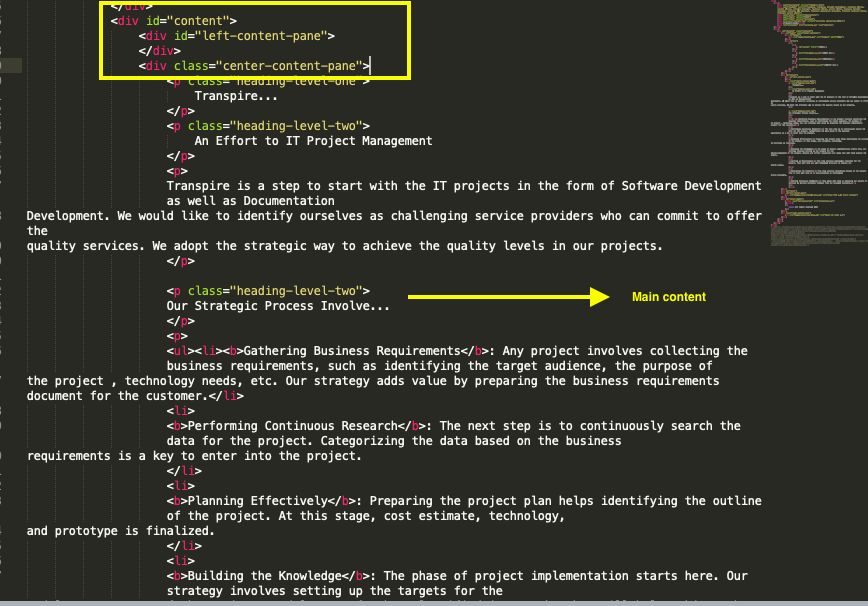
- The <div id> = “Content” is the main block which is again divided into 2 blocks.
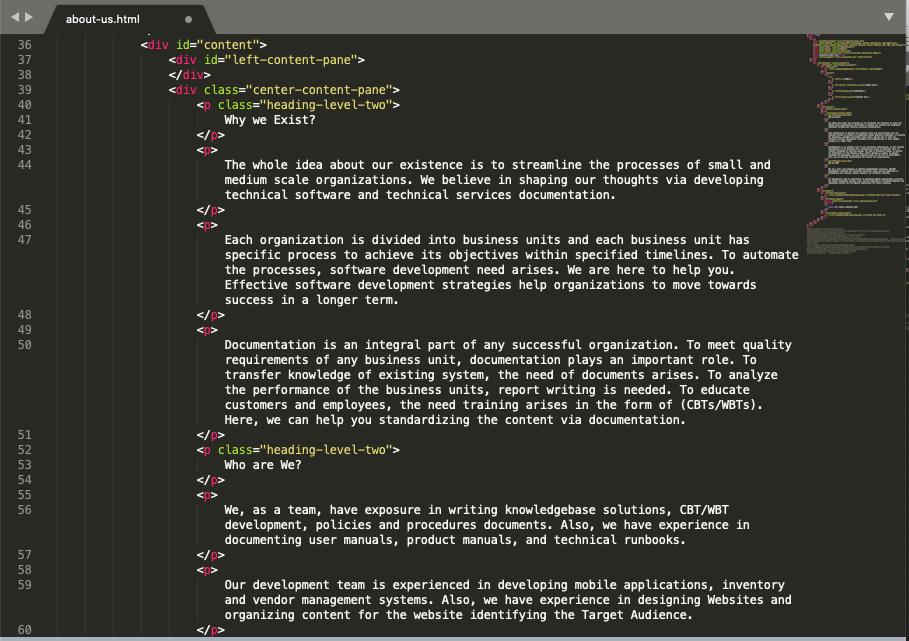
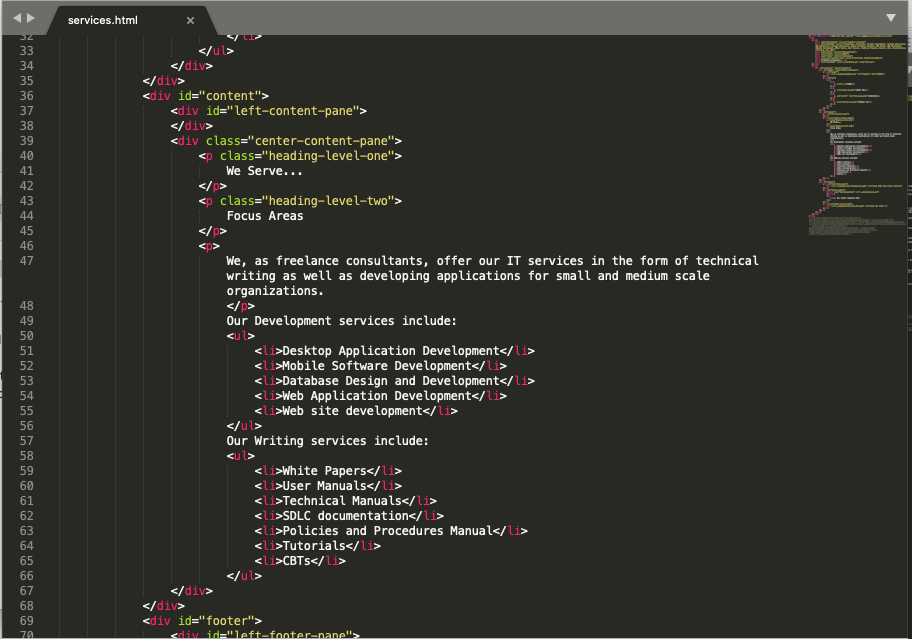
- The <div id> =”left-content-pane” is the left column of the website and <div class> “center-content-pane” is the center block of the website. Reference screenshot below.
- The last bottom part is a footer that is divided into 3 parts – Left, middle and right sides. The Left and right sides contain images and the middle block contains the text “All rights reserved”.

- This is how an index.html is created. Now, in the same way, about-us.html, services.html, and contact-us.html are created.
- These files are located in the html folder we created.
- about-us.html – The header, footer, and nav tags and content are the same as the index.html file.
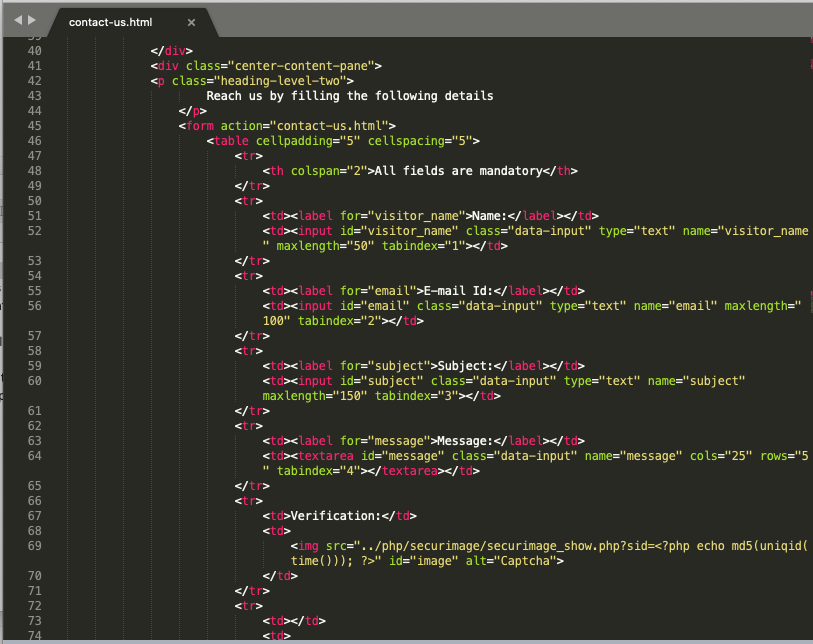
- The same way services.html and contact-us.html are created.
- services.html
- contact-us.html
The next part of website creation is robots.txt and sitemap.xml files that are stored in the root folder.
The robots.txt file contains Internet protocol standards while creating a website. You need to specify parameters such as user-agent, URLs, and Google-specific details if you are going to use Google’s robots.txt file.
The sitemap.xml is used for Search Engine Optimization (SEO) purposes. To improve indexing, the sitemap.xml file is used. It contains all your web pages, images, videos, and news links for indexing. Crawling your website is achieved through sitemaps.
Once your website is ready, you can deploy the same on your Internet server. Once it is live on production, you can check the validations as a part of testing your website.
The testing process involves 2-steps:
- Find HTML errors from the website
- Fix HTML errors from website
How to Find HTML Errors on Website
- Go to the https://validator.w3.org/ Website to check your website validity.

- You can do testing of your website in three ways:
- Validate by URI
- Validate by File Upload
- Validate by Direct Input
- We will use the 1st option – Validate by URI.
- Enter the website name in the Address box. For example www.transpire.com
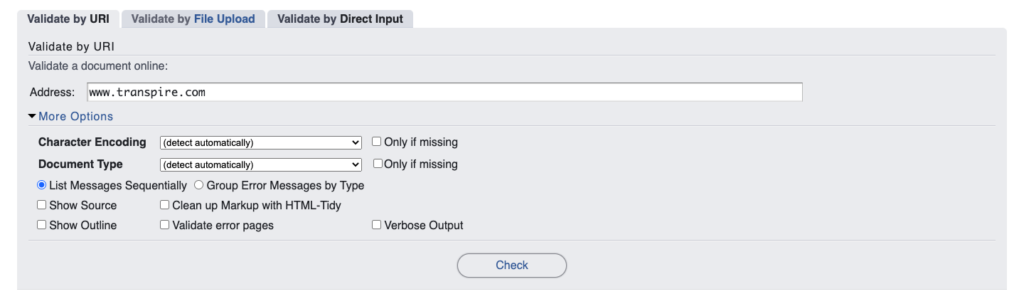
- Click the Check button. You will see a list of errors and warnings on the site.
- You can set More Options to group the error message by type, show source, and validation options.
- The errors are displayed below. You will see a list of warnings and errors.
- Let us understand the errors first. Warnings can be ignored.
- To ignore warnings, click Hide all warnings from the Message filtering section below.
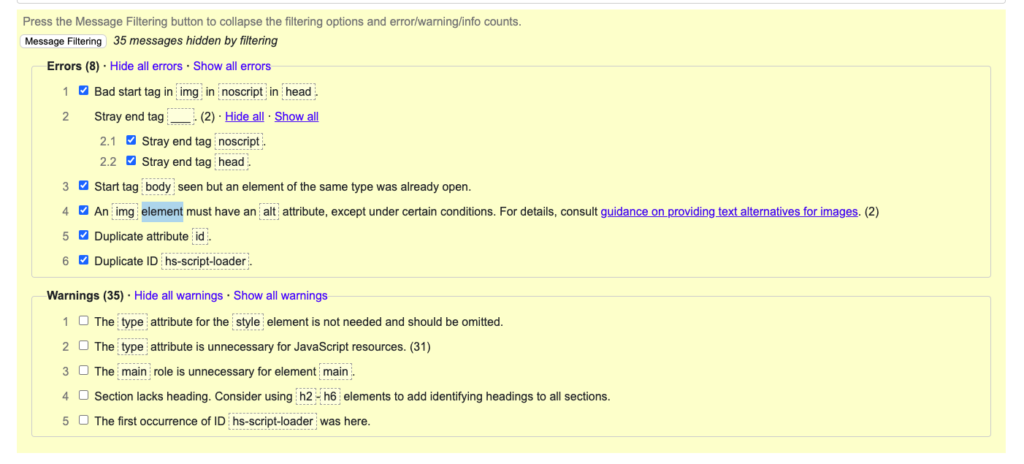
- Only errors will be shown below.
- Let us understand each error one by one and how to fix it.
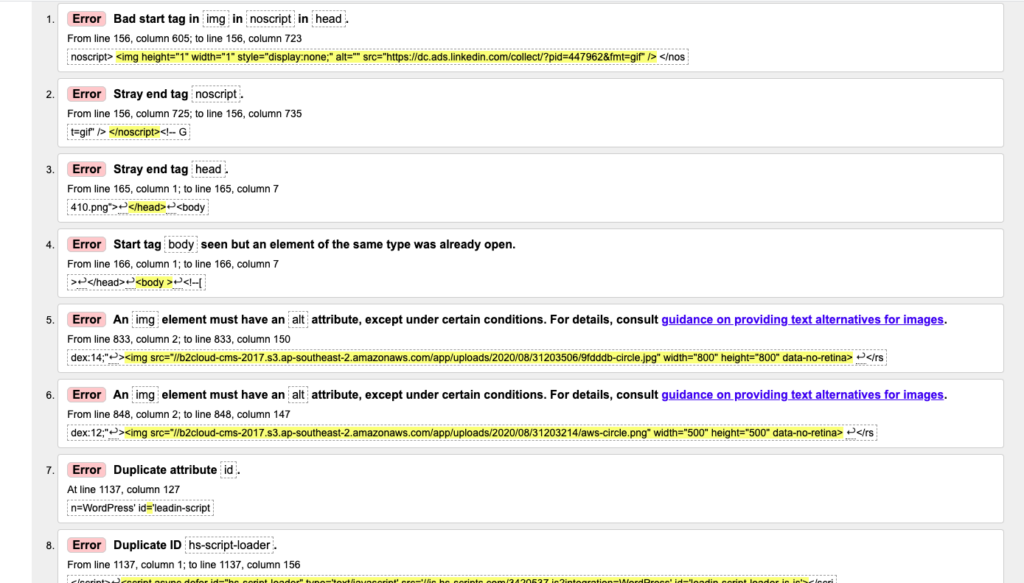
- Error 5 and Error 6

- Interpretation of these errors – Images of the website is only visible to you but not visible to the public.
- Resolution / Fix – add the <alt> attribute in the image tag as shown in the green below.
<img src="//b2cloud-cms-2017.s3.ap-southeast-2.amazonaws.com/app/uploads/2020/08/31203506/9fdddb-circle.jpg" alt=”circle of multiple colors image” width="800" height="800" data-no-retina<img src="//b2cloud-cms-2017.s3.ap-southeast-2.amazonaws.com/app/uploads/2020/08/31203214/aws-circle.png" alt=”AWS circle image” width="500" height="500" data-no-retina> - Click the Check button. The above 2 errors will not be displayed. They are fixed.
- Error 7 and Error 8

- Interpretation of these errors – You have defined 2 tags with the same div ID. ‘
- Resolution / Fix – You can rename one of them and the error will be resolved.
- Error 1

- Interpretation of the error – the <img> tag should never be there in the <head>, though you have specified it under <noscript>.
- Resolution / Fix – You need to move the <img> tag to the <body> tag.
- Error 2, Error 3 and Error 4
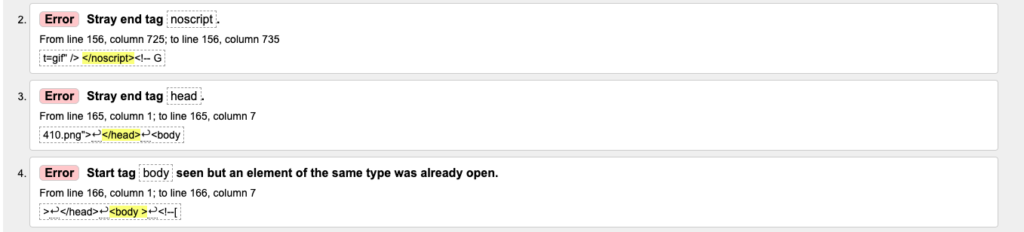
- Interpretation of the error 2 – the <img> tag is inside the <noscript> tag.
- Resolution / Fix – Insert <p> tag inside the <noscript> tag and then, insert the <img> tag.
- The structure will be like this – <noscript><p><img src =”imagename.gif”></p></noscript>
- Interpretation of the error 3 – the <img> tag is inside the <head> tag.
- Resolution / Fix of error 3 – move the <img> tag inside the <bod> tag.
- Interpretation of the error 4 – Between your </head> tag and the start of <body>, any extra tag is inserted.
- Resolution / Fix of error 4 – Remove the extra tag between the </head> tag and the <body> tag.
- Run the check again. The validator will give only warnings and all the errors will be resolved.
You can also use the validator before you are deploying your website onto production. Just copy and paste your HTML code in the third option, Validate by Direct Input. Click that tab.
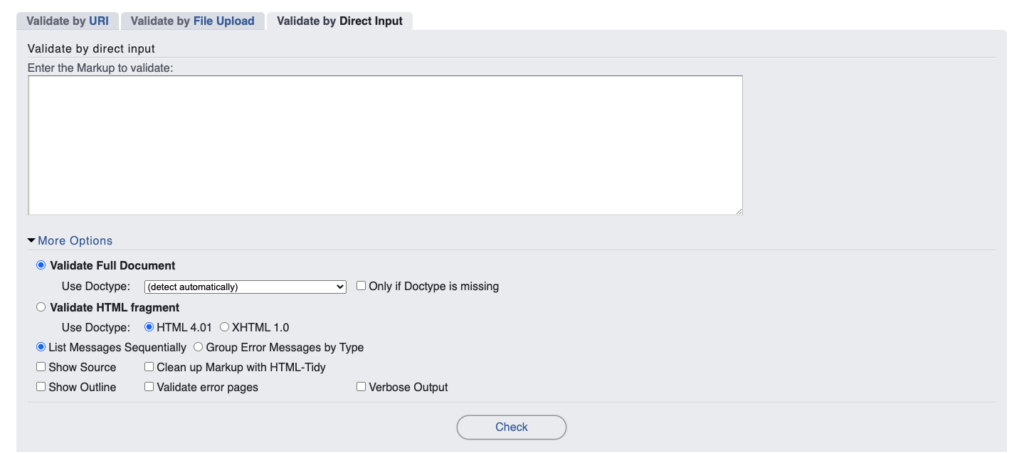
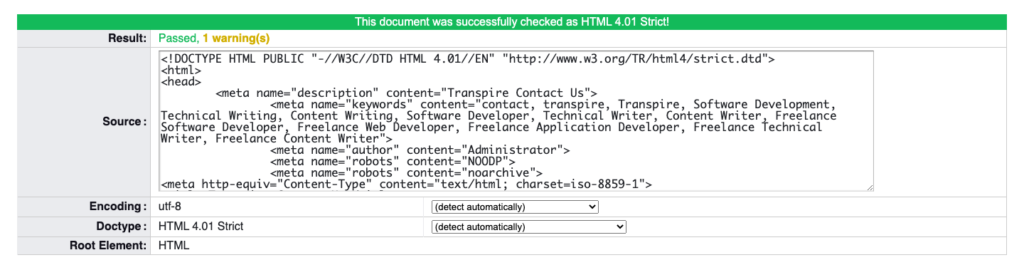
Copy your HTML file content and paste it into the Enter the Markup to validate the text area. Click the Check button. You will see the result with the “Passed” status and you are ready to launch your website.
Thanks to Validators
Website development is now a quick and faster process. Thanks to the tools and technology that have made it easier and faster. Not only development, error findings, and fixing processes have also become convenient. You get to know the errors before moving the website to production and fix them with a lot of help from the Internet. You fix HTML errors and it is ready to roll out!
You may also like:
- 6 Tips to Find the Best WordPress Theme for Your Business Website
- How to Choose Cloud Platform or Hosting for Business Website
- How To Alphabetize Bookmarks In Chrome?
